
How to Build a Zero-Defect Jewellery Factory: From Design to Final Quality Control
In jewellery manufacturing, the phrase “zero defect” is often misunderstood. It does not mean that a factory will never experience a mistake, casting flaw or broken stone. It means the factory has been designed so that abnormalities are detected immediately, affected work is contained and no known defect is knowingly transferred to the next department or customer.
For a gold and diamond jewellery factory, this principle is especially important. A defect does not only create rework. It can cause precious-metal loss, stone damage, late delivery, customer returns, disputes over purity and permanent damage to the manufacturer’s reputation. The most effective system therefore combines product engineering, production discipline, measurement, material accountability, digital traceability and management action.
CORE RULE Do not pass a known defect forward. Stop the operation, identify and segregate the affected pieces, decide the authorised disposition and release the work only after verification.
Zero defect is an operating system - not an inspection department
A genuine zero-defect factory gives every operation seven essentials: a defined input, an approved method, a measurable acceptance limit, a trained owner, first-piece approval, self-checking and a clear reaction plan. Independent verification is added wherever the risk, cost or irreversibility of the next step demands it.
The philosophy is simple: quality is created at the workstation. The next department is the internal customer, so an artisan or operator never sends forward a problem with the hope that somebody will 'adjust it later'. Verbal assurance is replaced by visible evidence - an approved revision, a measurement result, a machine log, a photograph, a signed gate release or a reconciled count and weight.
This definition also makes zero defect realistic. It does not claim that variation will disappear overnight. It creates a disciplined system that prevents avoidable errors, detects abnormalities early, contains their impact and learns fast enough to prevent recurrence.
Begin with a measurable 12-month target state
A transformation needs a destination. The following targets provide a strong starting point for a 100-300-person gold and diamond jewellery factory. Each organisation should validate them against its product mix, customer requirements, process capability and statutory obligations.
The 12-month target state
The targets below establish the management direction. Product-family and process targets can be tighter, but they must never encourage hidden correction, deferred defects or unexplained metal movement.
|
Outcome |
Target |
Owner |
|
Customer return rate |
<=0.30% of pieces shipped; stretch <=0.10% |
Head - Quality |
|
First Pass Yield (FPY) |
>=95% overall; each critical process >=90% |
Production heads |
|
Internal rework |
<=3% of pieces; tracked by defect and process |
Production Manager |
|
Metal reconciliation |
100% daily; unexplained variance within approved process limit |
Metal Controller |
|
On-time delivery |
>=95% of confirmed orders |
Planning Head |
|
Stone loss / loose-stone return |
<=0.10% of pieces; critical stones 100% pull/tap checked |
Setting + QC |
|
Repeat defects |
No recurrence after verified CAPA closure |
Quality + Process Owner |
|
Traceability |
100% piece/batch history from raw material to dispatch |
ERP/MIS Owner |
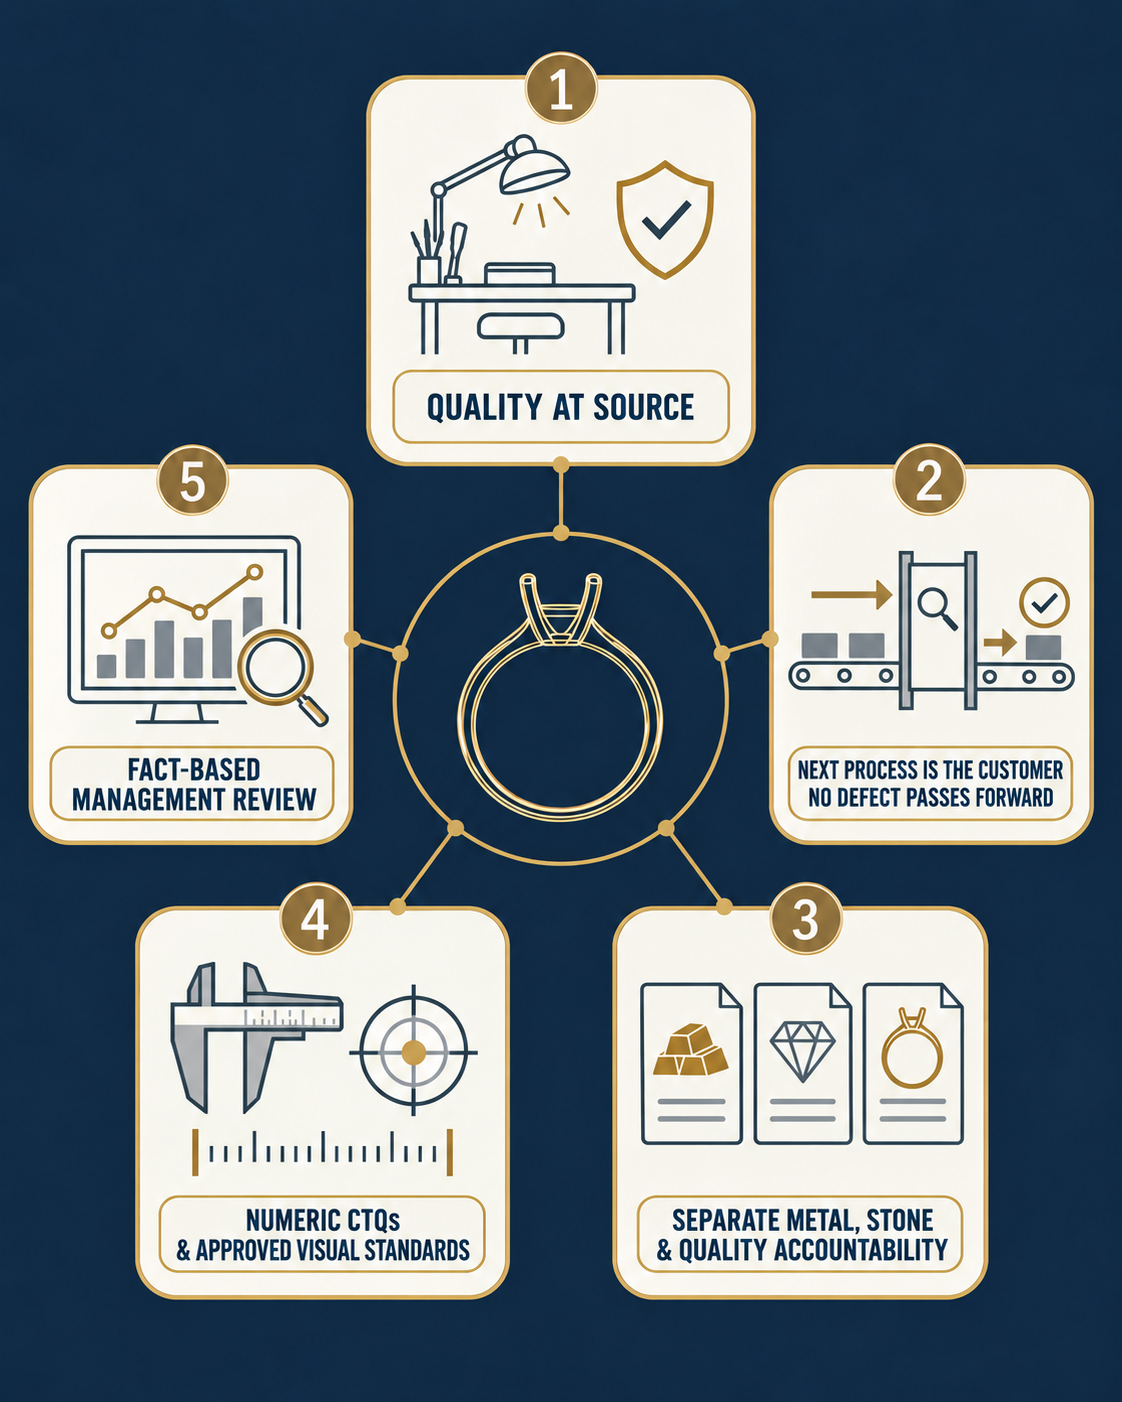
Five operating principles
Quality is made at the workstation, not inspected into the product.
The next process is the customer; no hidden or "adjust later" defect moves forward.
Precious metal, stones and product quality use linked but separate accountability records.
Critical-to-quality (CTQ) limits are numeric wherever possible; photographs and master samples control appearance.
Management reviews facts by product family, process, shift, operator, machine and defect - not only monthly averages.
These principles are interdependent. Faster delivery is not an improvement if rework is hidden, and high reported yield is not evidence of control when metal variance remains unexplained. Progress is genuine only when quality, delivery, cost, people and material accountability improve together.
Zero defect begins at the workstation: correct input, approved method, measurable CTQ and stop authority.

The five operating principles of a zero-defect jewellery factory.
2. Factory quality architecture
Governance and authority
Zero defect requires explicit authority, not vague responsibility. Every role must know what it owns and what it is empowered to stop.
|
Role |
Core accountability |
Authority |
|
Plant Head |
Safety, delivery, cost and quality culture; chairs daily review |
Stop production; approve resources |
|
Production Manager |
Plan, manpower, WIP flow, standard work and FPY |
Hold or reroute batches; change staffing |
|
Head - Quality |
QMS, CTQs, audits, calibration, NCR/CAPA and customer complaints |
Independent release/reject; stop shipment |
|
Metal Controller |
Issue, return, recovery and reconciliation by job, karat and department |
Stop metal issue on mismatch |
|
Planning & Control |
BOM/routing, capacity, priority, due dates and WIP ageing |
Freeze daily dispatch plan |
|
Department Supervisor |
First piece, hourly control, skills, housekeeping and handover |
Stop machine/process |
|
Operator / Artisan |
Follow the work instruction, self-inspect and report abnormality |
Stop and call; never conceal or rework silently |
|
Maintenance / Tool Room |
Machine capability, preventive maintenance, fixtures and utilities |
Lock out incapable equipment |
|
MIS / ERP |
Unique IDs, master data, dashboards and audit trail |
Block incomplete transactions |
Three lines of control
|
Line |
Who |
Purpose |
Evidence |
|
1 - Make right |
Operator + supervisor |
Self-check, first piece, parameter record and reaction plan |
Traveller, check sheet and machine log |
|
2 - Verify |
Quality at gates |
Risk-based independent acceptance before irreversible or high-cost steps |
Gate release, measurement record and photo |
|
3 - Assure |
Quality systems + internal audit |
Confirm system discipline and effectiveness |
Layered audit, CAPA, MSA and trend review |
Mandatory quality gates
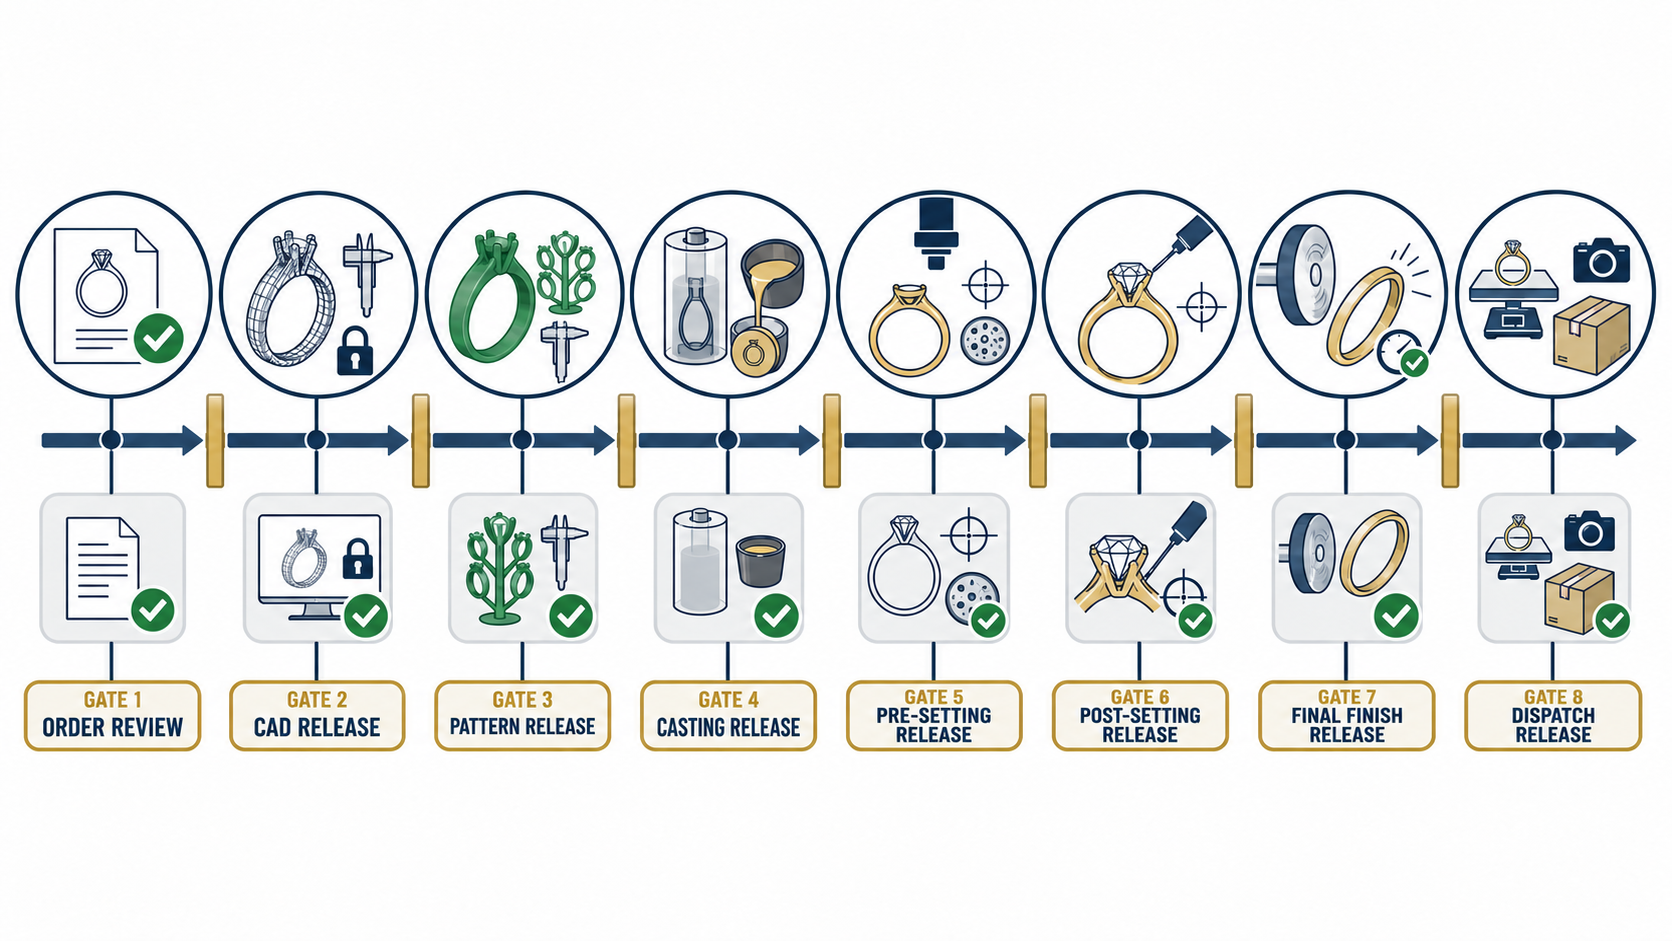
|
Gate |
Release point |
Minimum release evidence |
|
G0 |
Order / technical review |
Approved drawing or render, BOM, karat, stone map, tolerances and sample reference |
|
G1 |
CAD approval |
Geometry checklist, weight estimate, wall/prong/seat dimensions and version lock |
|
G2 |
Master / wax / resin |
Dimension, weight and visual approval; sprue plan; first-piece approval |
|
G3 |
Casting |
Alloy/lot trace, process parameters, X-ray or sample where required, and metal balance |
|
G4 |
Pre-setting |
Dimensions, porosity, solder joints, symmetry, surface and stone-seat readiness |
|
G5 |
Post-setting |
Stone count/identity, security, alignment, damage and metal finish |
|
G6 |
Final finish |
CTQ measurements, visual standard, functional tests and hallmark readiness |
|
G7 |
Dispatch |
Final audit, weight/stone/invoice match, packaging, photograph and seal |
3. Define the product and process before production
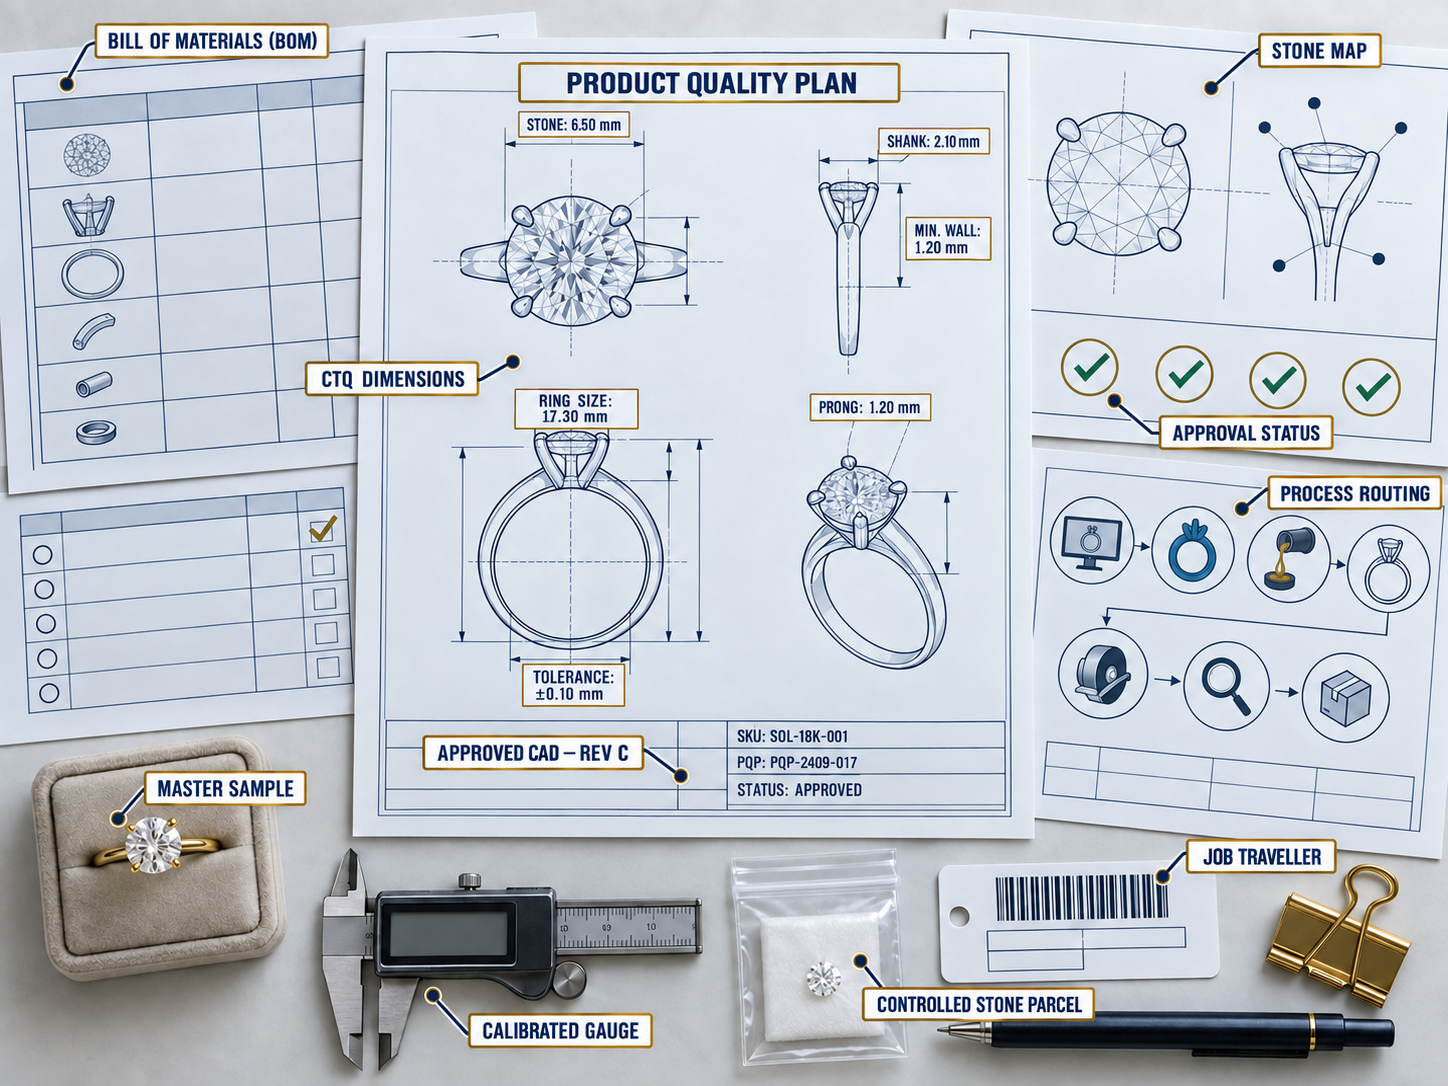
The Product Quality Plan: one per SKU or family
Production must not start from a render alone. Planning releases a controlled Product Quality Plan (PQP) containing all of the following:
27. Customer/order and SKU; CAD filename and revision; approved image or master sample.
28. Metal type, karat, colour, alloy code, finished gross/net weight range and permitted process loss.
29. BOM with component quantities, stone identity, sieve or millimetre sizes, shape, colour/clarity grade and substitution rule.
30. CTQs: finished dimensions, minimum wall, prong diameter/height, stone-seat geometry, joint strength, clasp function, pair matching, surface finish and hallmark location.
31. Routing and outsourced steps; inspection gates; sampling level; special handling and packaging.
32. Known risks and lessons from previous orders; any approved deviation signed by authorised functions.
Practical default CTQs - engineering must validate by design
|
Feature |
Default production control |
Release method |
|
Critical fit / assembly |
Drawing tolerance, typically +/-0.05-0.10 mm depending on function |
Calibrated vernier, microscope or gauges |
|
General visible dimension |
Drawing tolerance, typically +/-0.10-0.20 mm |
Gauge plus overlay/master |
|
Finished weight |
Approved target/range by SKU; investigate beyond range |
Calibrated balance |
|
Prongs |
Consistent geometry; adequate metal after finishing; no cracks or cuts |
10x visual plus dimensional sample |
|
Stone security |
No movement; defined tap/probe/pull method by stone and setting risk |
100% check for set pieces |
|
Pair matching |
Weight, length, geometry, stone orientation and colour match |
Pair board, gauge and photo standard |
|
Surface |
No porosity, pits, tool marks, fire stain, excess solder or sharp edges |
Controlled light; 10x where specified |
|
Function |
Clasp, hinge, screw, post, chain and articulation work for specified cycles |
100% functional test |
|
Purity |
Approved alloy recipe and assay/hallmark compliance |
Lot assay/XRF plus statutory hallmark route |
|
ENGINEERING CAUTION These are starting controls, not universal design limits. Engineering must set SKU-specific values after design validation, process capability and wear/strength testing. |
Change control
Any change to CAD, alloy, stone source, wax/resin, investment, casting program, solder, plating chemistry, supplier, machine, fixture or acceptance standard requires a change request, risk review, trial, first-article approval, document update and controlled effective date. Old versions must be quarantined electronically and physically.
4. Control every process from order entry to dispatch
Order entry, design and CAD/CAM
|
Risk |
Prevention control |
Detection / record |
Stop condition |
|
Wrong customer requirement |
Technical review; signed render/drawing; query log |
PQP approval |
Missing approval or conflicting data |
|
Wrong CAD revision |
Read-only released folder; revision code in traveller |
File checksum/version on build sheet |
Unreleased file |
|
Weak walls, prongs or joins |
Automated CAD rules plus senior design review |
CTQ checklist; section analysis |
Below approved minimum |
|
Wrong weight |
Volume x validated alloy density x process factor |
Predicted vs sample/finished weight |
Outside target without approval |
|
Poor print orientation/support |
Build simulation and standard orientation library |
First-build review |
Unsupported or at-risk feature |
CAD first-article approval requires the first physical piece or a small pilot lot to pass dimensions, assembly, casting fill, finish allowance, setting access and target weight before mass production.
Incoming materials and supplier quality
|
Material |
Incoming checks |
Control |
|
Fine metal / alloy |
Certificate, weight, identity, purity/chemistry and seal |
Approved supplier; lot number; locked storage |
|
Diamonds / gemstones |
Count/weight, sieve/mm, identity, grade, damage and matching |
Parcel ID; dual custody; calibrated equipment |
|
Wax / resin |
Batch, shelf life, storage and ash/print behaviour |
FEFO; trial coupon after batch or change |
|
Investment powder |
Batch, moisture exposure, shelf life and packaging |
Dry storage; mix log; controlled water |
|
Solder / chemicals / plating |
Identity, grade, concentration or COA, and expiry |
SDS; labelled secondary containers; FIFO/FEFO |
|
Findings / components |
Dimension, function, finish, purity and sample match |
Approved sample; lot-status label |
|
Packaging |
Size, branding, damage and anti-tarnish performance |
Approved sample and inspection |
Score each supplier monthly: incoming rejection 40%, on-time delivery 25%, response/CAPA 15%, documentation/traceability 10%, and commercial/service 10%. Suppliers below the approved threshold enter development, restricted use or disqualification.
Wax/resin printing and pattern preparation

33. Run machine warm-up and a daily verification coupon; record material lot, machine, operator, build file, layer setting and start/end time.
34. Inspect 100% of patterns for missing features, layer shift, distortion, support marks, breakage and contamination.
35. Measure CTQs on the first pattern and a defined sample; weigh standard coupons to detect material or process drift.
36. Use dedicated clean tools and trays, identified cavities and an exact pattern count into each tree.
37. Repair only under an approved method. Critical geometry repair requires reprinting; never disguise defects with wax.
Spruing, investing, burnout and casting
|
Stage |
Standardised controls |
Record / verification |
|
Tree design |
Tree map; controlled sprue size/location; flow and shrinkage logic; no mixed incompatible parts |
Tree ID, pattern count/weight and photo |
|
Investing |
Calibrated water/powder ratio, temperature, mix/vacuum times and bench set |
Batch log; scale/timer/temperature verification |
|
Burnout |
Validated cycle by flask size/material; furnace mapping; load pattern |
Program print/log and furnace ID |
|
Metal preparation |
Segregated karat/colour; approved alloy recipe; controlled recycled-metalpercentage |
Issue weight, lot, recipe and assay status |
|
Casting |
Validated metal/flask temperature, vacuum/pressure, melt time and protection |
Machine data, operator and abnormality record |
|
Quench / divest |
Defined cooling/quench window; controlled handling and recovery |
Time log and recovery-container ID |
|
Post-cast |
Tree visual; fill, porosity, cracks and inclusions; sample or X-ray by risk |
Casting release, defect map and metal balance |
|
HIGH-RISK RULE Never "average out" a failed casting lot. If the sample shows a systemic defect, hold the entire lot; increase inspection or remake after documented disposition. |
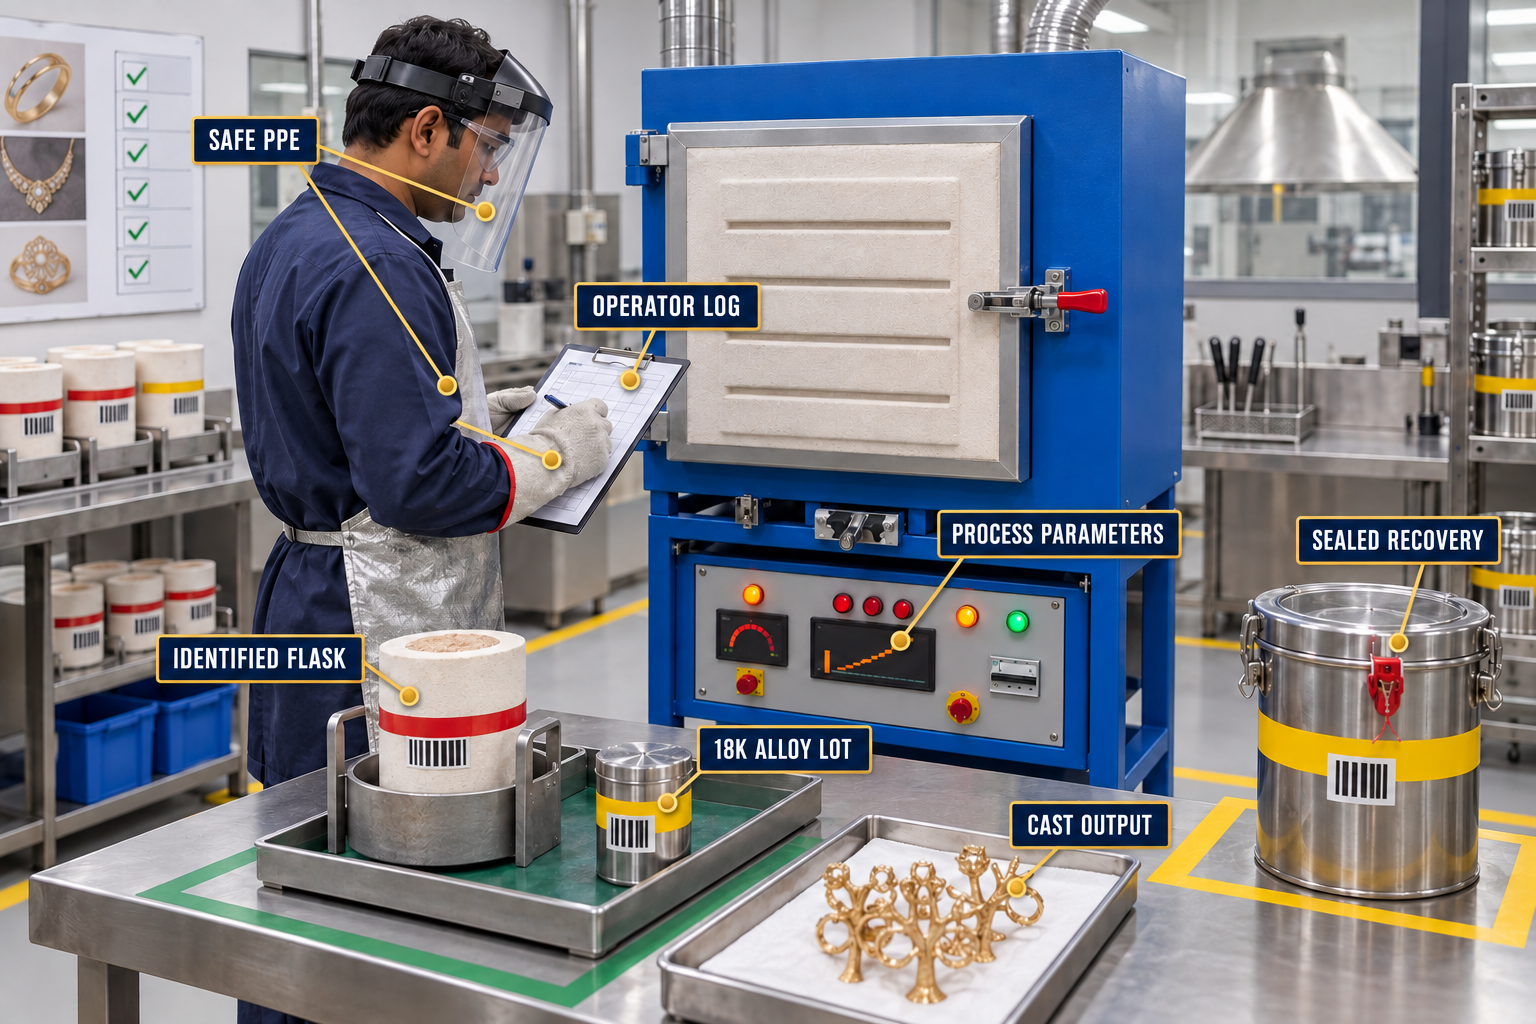
Cutting, grinding, assembly and soldering or laser welding
38. Issue a controlled joint map and approved solder grade or laser parameter by karat and component.
39. Use dedicated karat/colour benches, files, sweeps trays and extraction to prevent contamination and protect recovery.
40. Use fixtures and poka-yoke to control alignment, dimensions and component orientation.
41. Perform pre-join fit checks, control joint gaps, clean surfaces, limit heat cycles and record repairs.
42. Inspect joint penetration, excess solder, distortion, cracks and function before surface finishing.
43. Keep each piece in a uniquely numbered tray or compartment; record quantity and weight at every department handover.
Pre-polish and surface preparation
Define a finishing route by SKU: abrasive-grade sequence, tool type and speed, maximum stock removal, inaccessible-area treatment and protective masking. Inspect shape retention, edge definition, symmetry, porosity exposure, engraving/detail and dimensional/weight loss. Repeated polishing to conceal porosity is prohibited.
Stone sorting and setting
|
Control point |
Required practice |
|
Issue |
Stone parcel ID, count/weight, size map and piece allocation; dual verification for high-value stones |
|
Seat preparation |
Correct seat depth and angle; sufficient metal; no cracks or porosity; clean access |
|
Setting |
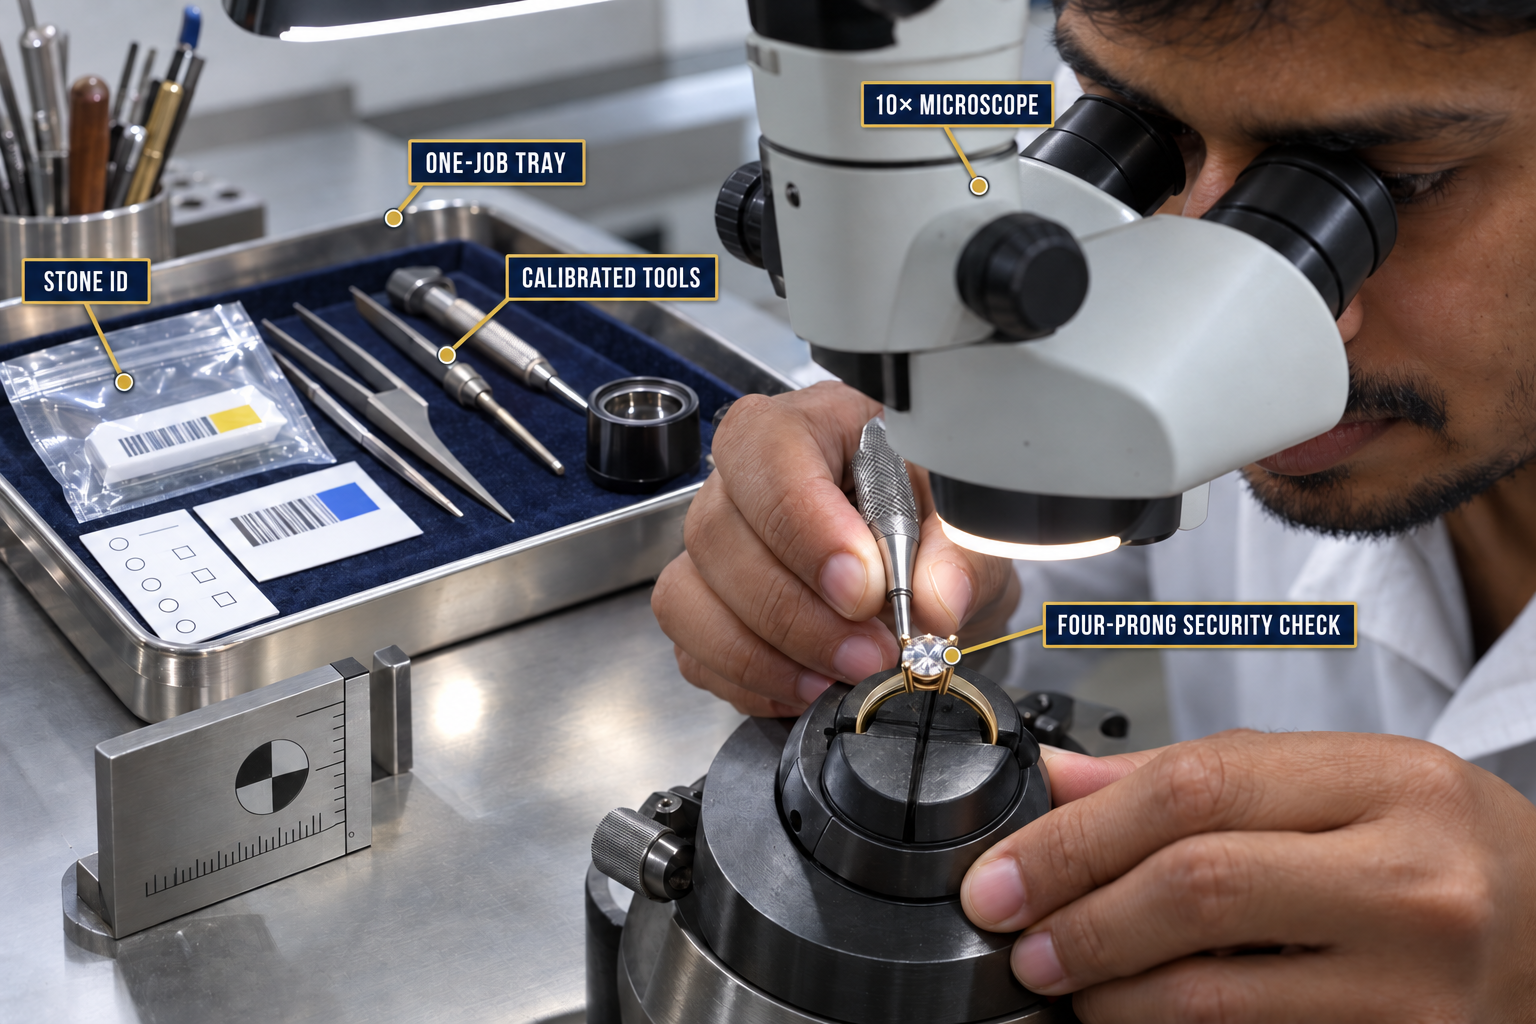
Approved tool condition and sequence; protect brittle or treated stones; microscope standards |
|
Self-check |
Level/orientation, spacing, girdle protection, prong/bead consistency and stone movement |
|
Independent check |
100% count and security; tap/probe method by setting; 10x surface/damage review |
|
Return / reconciliation |
Set, broken, missing and unused stones reconciled to issue; breakage reason code |
|
High-risk designs |
Pilot wear/impact/snag test; enhanced pull or vibration test with engineering-defined limit |
Final polish, cleaning, plating and coating
44. Validate polishing compounds, mop/wheel, speed, pressure and cleaning recipe by product family.
45. Control each bath by identity, filtration, temperature, time, current/voltage, agitation and chemistry analysis; define dummy and load rules.
46. Use reference coupons for colour and thickness. Measure coating thickness where contractually or technically required.
47. Inspect under controlled 4000-5500 K high-CRI light against the approved master; keep lighting position and background consistent.
48. Release cleaning only when no compound remains in galleries or hinges, no water spots, stains or trapped media remain, and the product is completely dry before packing.
Final inspection and dispatch
|
Final check |
Method |
Frequency |
|
Identity / revision / order |
Traveller, ERP and physical piece match |
100% |
|
Count, gross/net weight |
Calibrated scale; BOM and invoice match |
100% |
|
Dimensions / size |
Ring gauge, vernier and templates |
100% critical; sample general |
|
Stone identity / count / security |
Stone map, 10x and security test |
100% |
|
Appearance |
Controlled light plus master/photo; all orientations |
100% |
|
Function and safety |
Clasp/hinge/screw/articulation; sharp-edge check |
100% |
|
Purity / hallmark |
Lot trace and statutory route/status |
100% records |
|
Packaging / labels |
Correct inserts, SKU, barcode and anti-tarnish protection |
100% |
|
Final audit |
Independent risk-based audit before seal |
Per audit plan; tightened after failure |
|
Dispatch evidence |
Final photo, weight, seal and carton ID |
100% high-value / policy-defined |

5. Close the precious-metal and stone accountability loops
The daily metal loop
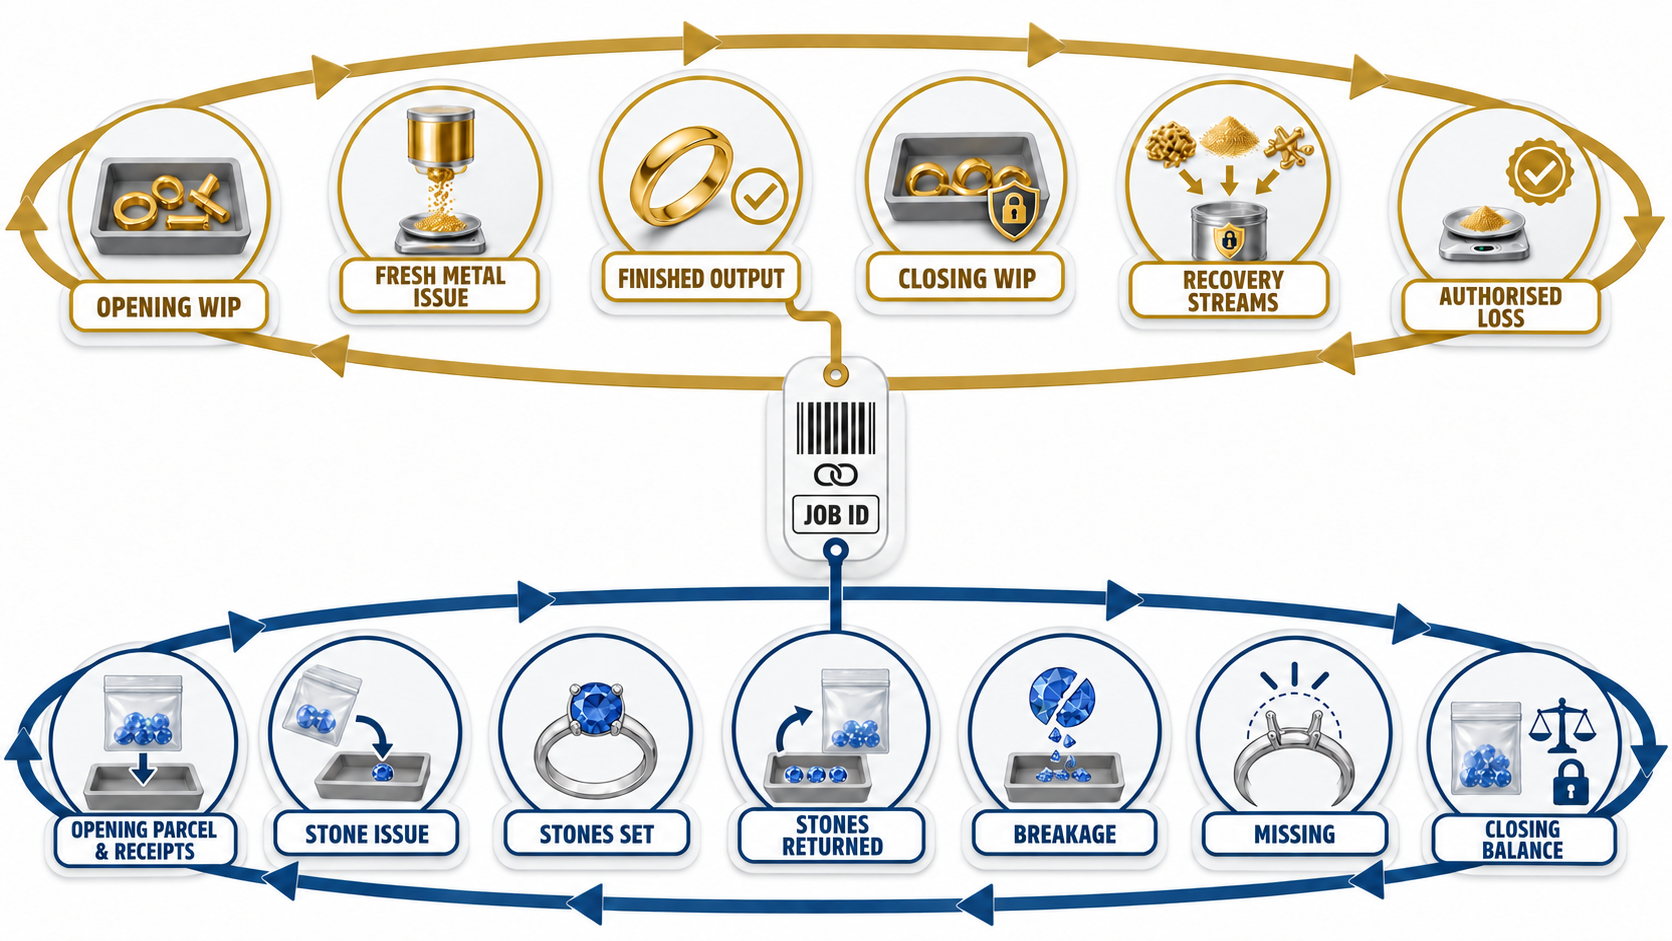
For every karat, colour and job, the factory must reconcile the complete material equation every day:
|
METAL BALANCE Opening WIP + fresh metal + approved returns/transfers = finished output + closing WIP + recoverable scrap + sweeps/dust/sludge + samples/destructive tests + authorised process loss. |
|
Control |
Minimum rule |
|
Issue / return |
Two-person verified weight; calibrated balance; sealed and identified container |
|
Department handover |
Piece count, gross metal weight, job ID, sender/receiver signatures and time |
|
Segregation |
By entity, customer ownership, karat, colour and recovery stream |
|
WIP count |
End-of-shift physical count/weight matched to ERP; exceptions locked |
|
Recovery |
Bench skins, filters, floors, polishing dust, sludge and solutions tagged by source and period |
|
Variance |
System-calculated; supervisor investigates in the same shift; escalation threshold by process |
|
Melting / reuse |
Assay status and approved recycled-content recipe; never mix unidentified material |
|
Stock verification |
Daily high-value checks; weekly cycle counts; monthly independent full reconciliation |
Set process-specific loss limits
Do not impose one factory-wide metal-loss percentage. Establish normal loss and recovery ranges separately for casting, cutting, assembly, polishing, setting and finishing, using 8-12 weeks of stable data by karat and product family. Set alert and stop limits statistically, and approve them jointly through Production, Quality and Finance or Metal Control.
Keep a separate stone ledger
Stone ledgers reconcile opening parcel + receipts = issued + returned + set + broken + missing + closing. High-value stones require unique identity, photograph, measurements and dual custody. No loose stone travels without an identified sealed packet and a recorded transaction.
6. Build defect prevention into every operation
Use a control plan at every operation
A control plan turns an abstract quality requirement into a repeatable workstation routine. The manual uses prong-seat cutting to show the minimum structure:
|
Field |
Example |
|
Operation / CTQ |
Prong-seat cutting / seat depth |
|
Specification |
Per released drawing or approved master |
|
Method / gauge |
Microscope reticle or go/no-go master |
|
Frequency |
First piece + every 25 pieces + after tool change |
|
Owner |
Setter; supervisor verifies the first piece |
|
Reaction |
Stop; isolate since last good check; correct tool/process; re-inspect |
|
Record |
Job traveller/control chart; gauge ID |
|
Escalation |
Repeat or critical defect -> NCR and Quality disposition |
Approve the first piece - and compare the last piece
At shift start, setup or changeover, tool/material/program change, or restart after an abnormality, the operator makes one piece. The supervisor and Quality approve its CTQs before the batch continues. At the end, compare the last piece with the first to expose drift. If a failure occurs, all pieces made after the last confirmed good check remain on hold.
Use mistake-proofing where memory can fail
|
Failure |
Poka-yoke / mistake-proofing |
|
Wrong alloy or karat |
Colour-coded locked bins + barcode recipe interlock + dedicated tools |
|
Wrong CAD revision |
Only a released file can generate a build ticket; obsolete folder inaccessible |
|
Left/right mismatch |
Cavity or fixture keyed by orientation; paired tray positions |
|
Missing component or stone |
Kitted shadow board or counted pockets; weight/count confirmation |
|
Wrong ring size |
Size-specific mandrel/gauge at station; barcode-to-gauge prompt |
|
Reversed assembly |
Asymmetric locating pins or jig |
|
Skipped inspection |
ERP blocks transfer without required result and operator/gauge ID |
|
Mixed WIP |
One-job-at-a-time tray; physical dividers; no unidentified loose pieces |
React to abnormalities in seven disciplined steps
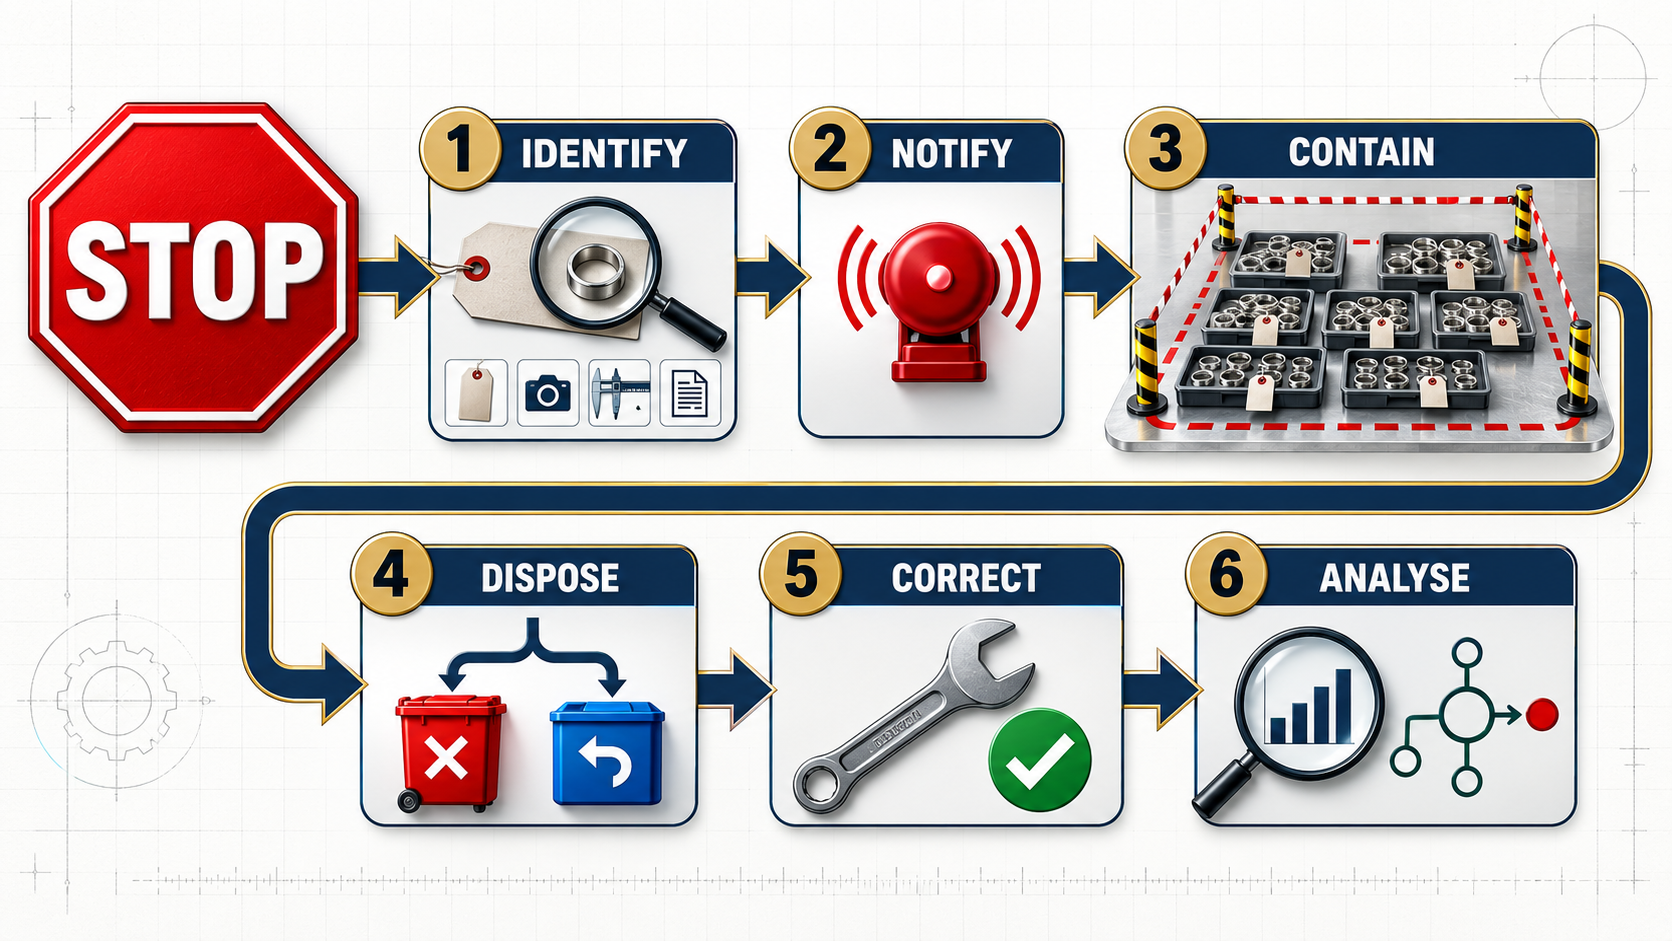
1. STOP the operation and prevent further production.
2. IDENTIFY and physically segregate affected material since the last known-good check.
3. NOTIFY the supervisor and Quality; record the factual defect, quantity, time, machine, tool and material.
4. CONTAIN upstream, in-process, stores, subcontractor and dispatch stock as applicable.
5. DISPOSE through an authorised Use-as-is, Rework, Remake or Scrap decision; obtain customer concession where required.
6. CORRECT the immediate cause, verify the first piece and restart only after authorised release.
7. ANALYSE the root cause and implement CAPA when the issue is critical, repeated, systemic or customer-affecting.
7. Make measurement and inspection reliable
Control the equipment system
|
Equipment |
Required control |
|
Balances |
Daily check weights; scheduled calibration; level, cleanliness and vibration control |
|
Verniers / micrometers |
Zero check before use; calibration; protection; defined force and method |
|
Ring / stone gauges |
Master comparison; wear/damage inspection; controlled standard |
|
Microscopes / lighting |
Standard magnification and illumination; clean optics; reference images |
|
XRF / assay equipment |
Certified reference standards, drift checks, controlled method and trained users |
|
Plating-thickness tester |
Certified foils/standards and repeatability checks |
|
Furnace / thermocouples |
Calibration and temperature-uniformity survey |
|
Timers / temperature / chemistry meters |
Calibration or verification at a risk-based interval |
Use Measurement System Analysis before tightening tolerances
Before tightening a tolerance, confirm that measurement variation is small enough to distinguish good product from bad. For numeric CTQs, run Gauge R&R with representative operators and parts. For visual defects, use Attribute Agreement Analysis: multiple inspectors classify a controlled defect set twice and compare their decisions with the master. Retrain inspectors or improve the standard wherever agreement is weak.
8. Create documentation and digital traceability
Minimum controlled documents
|
Level |
Documents |
|
Policy |
Quality policy, objectives, responsibility and stop-work authority |
|
Process |
Process maps, SOPs, routing, risk assessment or FMEA, and control plans |
|
Workstation |
Visual work instructions, setup sheets, master samples and reaction plans |
|
Records |
Traveller, inspections, machine/bath logs, handovers, metal/stone ledgers and NCR/CAPA |
|
Assurance |
Calibration, maintenance, training, supplier rating, audits and management review |
Piece and batch genealogy
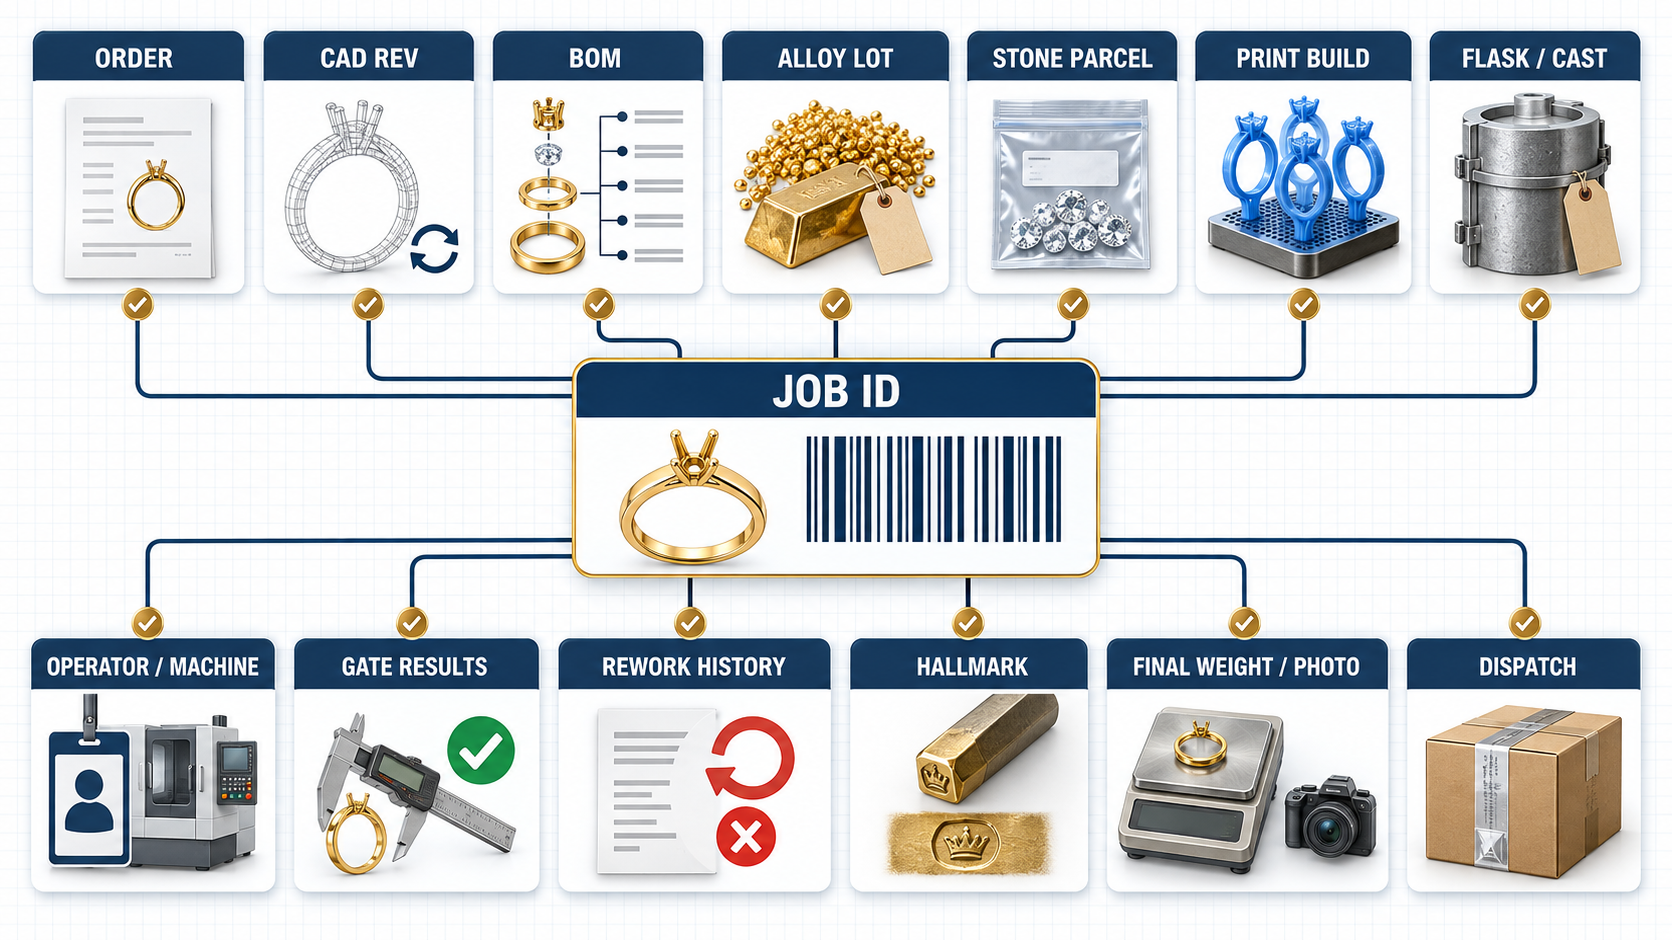
The unique job, batch or piece ID links the full history: customer order -> SKU/revision -> BOM -> metal/alloy lot -> stone parcels -> wax/resin build -> tree/flask/cast -> operators and machines -> parameter records -> repairs/rework -> inspections -> hallmark/assay -> final weight and photo -> packing, carton and dispatch. Barcode or RFID can accelerate capture, but disciplined transaction design comes first.
ERP transaction controls
8. Do not permit negative stock, backdated edits or deletion without an authorised audit trail.
9. Require a scan at issue, start, complete, reject, rework, transfer and receipt.
10. Keep reason codes short, controlled and mutually exclusive; notes may supplement but never replace codes.
11. Block transfer when quantity, weight, inspection or metal balance is incomplete.
12. Use role-based access to separate production entry, Quality release, metal adjustment and master-data change.
13. Run a daily exception dashboard for aged WIP, missing transactions, unexplained weight, skipped gates, overdue calibration and open NCRs.
9. Build skills and shop-floor discipline
Certify skill by process and product family
|
Level |
Meaning |
Permission |
|
L0 - Trainee |
Under instruction; method not yet demonstrated |
Cannot work alone |
|
L1 - Assisted |
Can perform the standard job with frequent check |
Approved families only |
|
L2 - Independent |
Passes theory, practical sample and quality history |
Self-check and routine production |
|
L3 - Expert / Trainer |
Handles difficult work, diagnoses abnormalities and trains |
First-piece mentoring and method improvement |
|
Inspector authorisation |
Passes defect-recognition and measurement-agreement tests |
May accept specified gates |
Certification is specific to the process and product family. It expires or is reviewed periodically, and it is suspended after a serious or repeated error until retraining and requalification are complete.
Establish a daily management cadence
|
Cadence |
Meeting / audit |
Agenda |
|
Shift start - 10 min |
Department huddle |
Safety, yesterday's defects, plan, CTQs and machine/material issues |
|
Every 2 hours |
Supervisor walk |
Standard work, WIP identity, first piece, abnormality and 5S |
|
Daily - 20 min |
Plant SQDCP review |
Safety, Quality, Delivery, Cost and People; top actions and owners |
|
Weekly - 60 min |
Quality and process review |
Pareto, FPY, rework, metal variance, CAPA, suppliers and capability |
|
Monthly |
Management review |
Objectives, customer, risks, resources, audit and improvement benefits |
Make the factory visual
Each department board shows today's plan versus actual, first-pass yield, top defects, held jobs, WIP ageing, metal variance, machine status, overdue actions and skill gaps. Display trends and actions, not decorative totals.

10. Use NCR, root cause and CAPA to prevent recurrence
Classify the defect by risk
|
Class |
Examples |
Required response |
|
Critical |
Wrong purity/identity, stone substitution, safety hazard, fraud or traceability breach |
Immediate stop and containment; Plant Head + Quality; shipment block |
|
Major |
Loose stone, failed clasp/joint, wrong size, visible porosity or material dimensional miss |
Segregate; authorised disposition; cause/action based on risk and repeat |
|
Minor |
Cosmetic deviation not affecting function within defined acceptance policy |
Record and trend; correct at source |
|
Opportunity |
No defect, but the method can reduce variation or waste |
Kaizen pipeline |
Separate occurrence, escape and systemic causes
Do not close CAPA with "operator mistake," "carelessness" or "retrained." Build the analysis from evidence: defect timeline, last known good, change history, parameters, material lot, tool and machine state, physical reproduction, and a structured 5-Why or fishbone analysis.
|
Cause layer |
Question |
Example action |
|
Occurrence |
Why was the defect created? |
Fixture redesign, parameter window or tool-life limit |
|
Escape |
Why was it not detected? |
Improve gauge, inspection frequency, lighting or gate |
|
Systemic |
Why did the management system allow it? |
Improve change control, training certification, maintenance or supplier control |
Verify CAPA effectiveness before closure
An action closes only after objective evidence of effectiveness: for example, three successful lots or 30 days without recurrence, improved FPY or capability, a completed layered audit and updated controlled documents. Quality verifies effectiveness independently.
11. Run one management system with honest KPIs
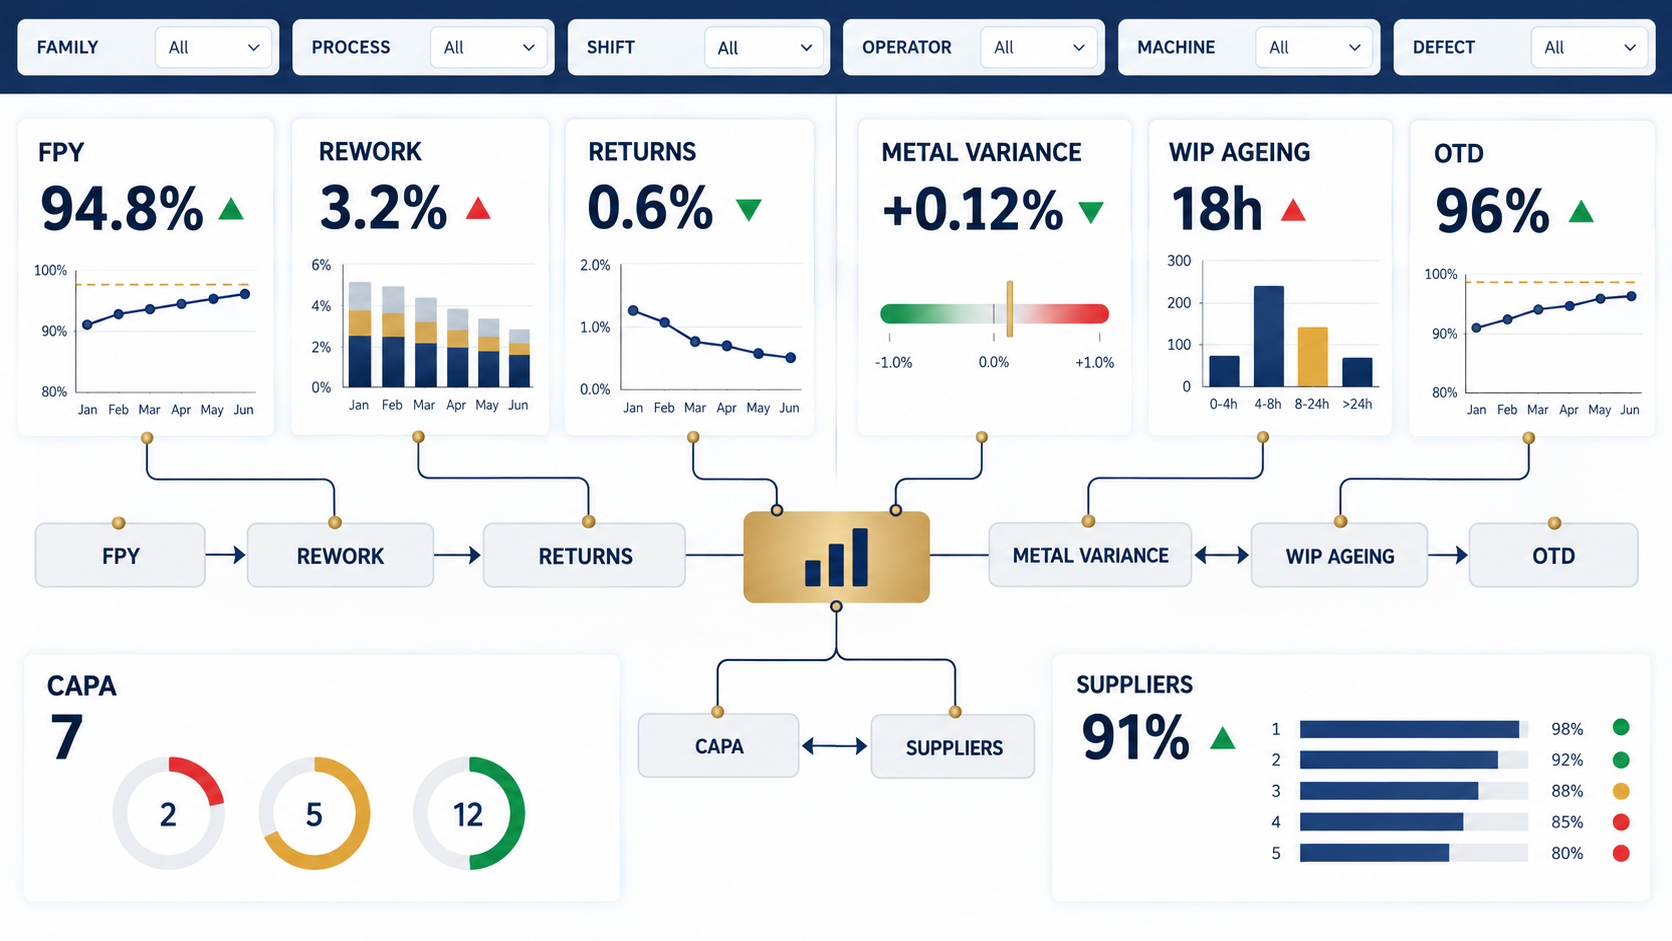
Quality, delivery, cost, people and material accountability must be reviewed together. A factory that improves delivery by hiding rework has not improved. A factory that reports excellent yield while carrying unexplained metal variance has not gained control.
|
KPI |
Formula / definition |
Review |
Trigger |
|
First Pass Yield |
Good without any rework / total processed x 100 |
Daily by process/SKU |
Below process target |
|
Rolled Throughput Yield |
Product of process FPYs |
Weekly |
Downward trend |
|
Defects per 100 pieces |
Defects / pieces x 100; count multiple defects |
Daily / weekly |
Pareto top 3 |
|
Rework rate |
Pieces reworked / pieces processed x 100 |
Daily |
Above 3% target |
|
Scrap / remake rate |
Scrap or remake pieces/value / output |
Weekly |
Any critical issue or adverse trend |
|
Customer returns |
Returned pieces / shipped pieces x 100 |
Monthly |
Any critical issue; >0.30% total |
|
Cost of Poor Quality |
Internal failure + external failure + appraisal waste |
Monthly |
Target annual reduction |
|
Metal variance |
Actual unresolved variance by process, job and karat |
Daily |
Above approved stop limit |
|
WIP ageing |
Jobs beyond route-stage time standard |
Daily |
Any due-date risk |
|
On-time delivery |
Orders shipped on or before confirmed date / due orders |
Daily / monthly |
Below 95% |
|
CAPA closure |
Closed on time and effective / actions due |
Weekly |
Overdue or ineffective |
|
Supplier ppm / rejection |
Rejected receipts, units or lots |
Monthly |
Below rating threshold |
|
ANTI-GAMING RULE FPY counts a piece as failed if it needs any correction after the operation, even when the rework succeeds. Never hide rework inside normal cycle time. |
12. Control maintenance, environment and utilities
Preventive and autonomous maintenance
14. Operators complete daily checks for cleanliness, guards, leaks, unusual noise, consumables, calibration status and verification samples.
15. Plan maintenance by hours or cycles and failure history; make a machine unavailable when critical preventive maintenance is overdue.
16. Maintain a critical-spares list with minimum stock and lead time, plus backup plans for the furnace, compressor, vacuum, filtration and IT.
17. Control tool life for burs, cutters, mops, electrodes, nozzles and fixtures.
18. After maintenance, verify setup and approve the first piece before release.
Control the working environment
|
Area |
Control focus |
|
CAD / printing |
Temperature, material storage, dust, power quality and file control |
|
Investing / casting |
Powder/moisture, water temperature, furnace ventilation and safe hot-work flow |
|
Setting / inspection |
Lighting, ergonomics, vibration-free benches and clean trays |
|
Polishing |
Local extraction, dust recovery, tool segregation and housekeeping |
|
Plating / chemicals |
Ventilation, bath segregation, water quality, labelled storage and spill/emergency controls |
|
Metal / stone vault |
Access control, surveillance, dual custody and count/weight discipline |
|
Packing |
Clean restricted area; anti-tarnish and product protection |
|
SAFETY BOUNDARY Assess safety and environmental legal requirements locally. Zero defect never justifies unsafe work, excessive surveillance or unauthorised exposure to chemicals, dust, heat, lasers or machinery. |
13. Use disciplined NPI and FMEA
New product introduction
|
Phase |
Deliverable |
Exit criterion |
|
1. Feasibility |
Requirement review, preliminary weight/cost and risk list |
Cross-functional approval |
|
2. Design |
Released CAD/drawing, BOM, CTQs and D-FMEA |
Design verification complete |
|
3. Process design |
Routing, tooling, P-FMEA, control plan and instructions |
Resources and gauges ready |
|
4. Pilot |
Small lot under production conditions |
All CTQs pass; issues closed |
|
5. Capability |
Repeat lots; FPY/capability, metal and cycle-time evidence |
Targets achieved or approved action plan |
|
6. Launch |
Frozen revision, trained/certified staff and approved sample |
Controlled mass production |
|
7. Review |
30/60/90-day defect, cost and delivery review |
Lessons incorporated |
Design and Process FMEA
For each possible failure, score severity, occurrence and detection using one consistent company scale, then prioritise high-severity and high-action-priority risks. Controls should first prevent occurrence, then improve detection. Update FMEA after complaints, major NCRs, process changes and new learning.
14. Control outsourced processes
Customer responsibility cannot be outsourced. Approved subcontractors receive controlled specifications, supplied-material and stone-accountability rules, approved samples and inspection requirements. Every dispatch and receipt reconciles count, weight and identity. First-off work, changes and high-risk lots receive enhanced verification. Contractual terms must cover audit access, confidentiality, security, non-substitution, traceability, scrap and recovery ownership, and CAPA response.
|
Outsource risk |
Required control |
|
Mixing / substitution |
Sealed identified lots; traceable metal/stone; supplier declaration and verification |
|
Uncontrolled process change |
Written change approval and first-article requalification |
|
Hidden rework |
Mandatory repair/rework disclosure and record |
|
Loss / shortage |
Dual weight/count; agreed tolerance and liability; secure logistics |
|
Quality escape |
Incoming gate based on supplier risk; no dock-to-stock until capability is proven |
15. Implement the system in phases
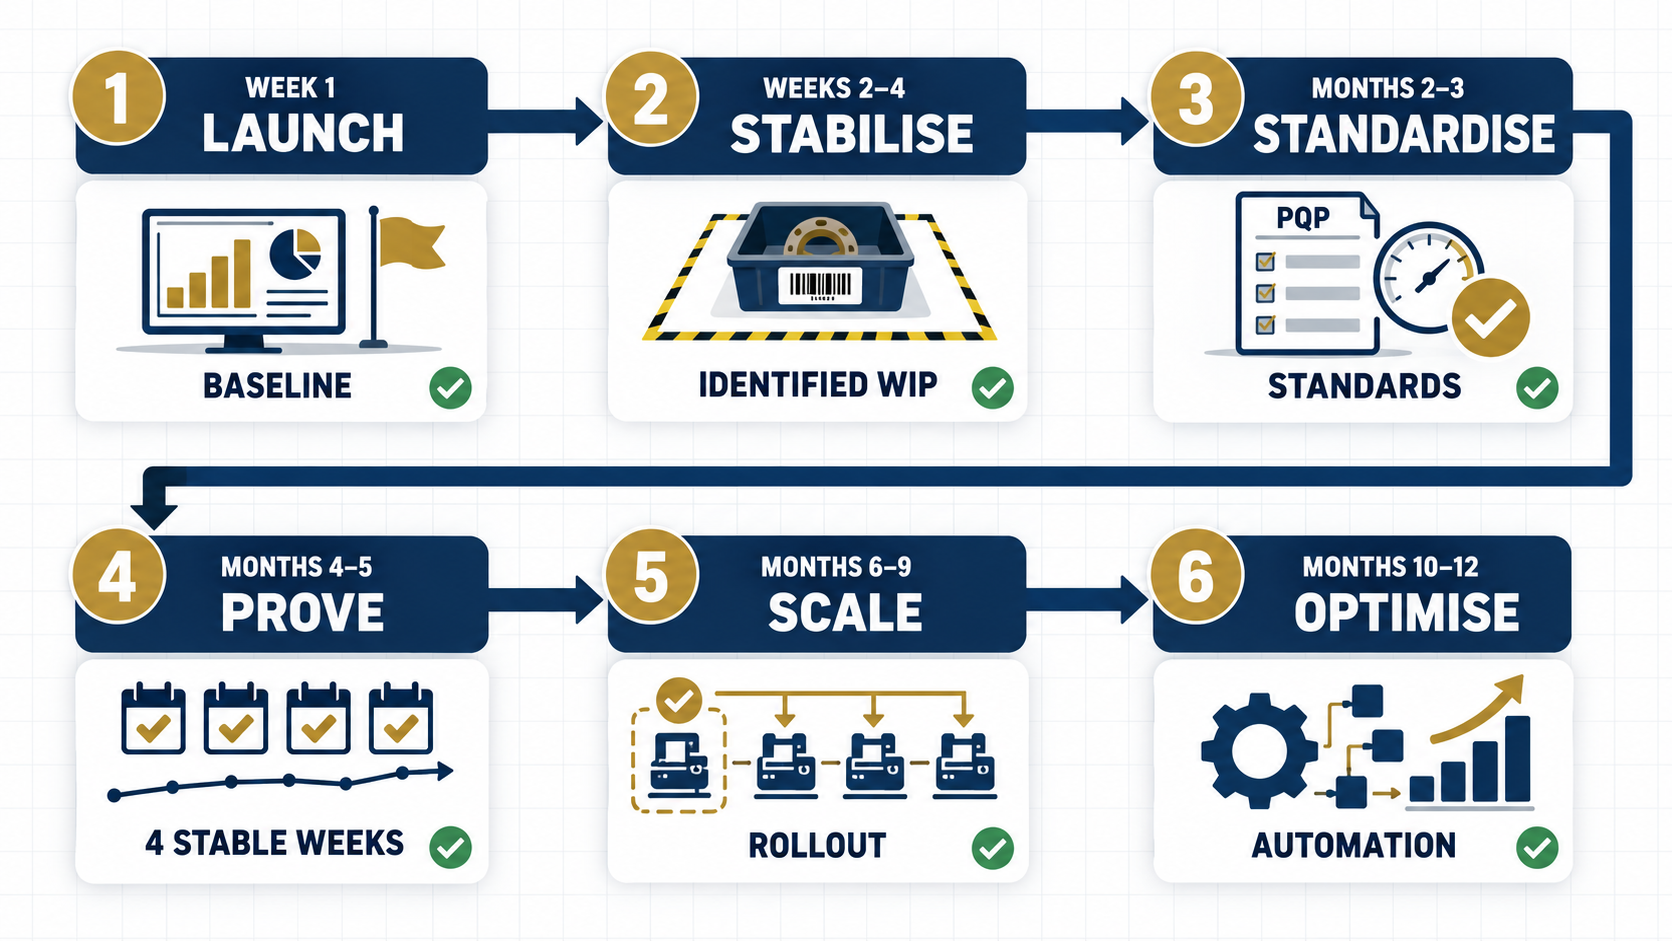
Phase 0: Week 1 - leadership launch
19. Appoint the Plant Head sponsor, Production Manager, independent Quality Head, Metal Controller and implementation leader.
20. Freeze the zero-defect policy, stop-work rule and no-hidden-rework rule.
21. Select one product family and value stream as the pilot.
22. Baseline four weeks of FPY, rework, returns, metal variance, lead time and WIP.
Phase 1: Days 1-30 - stabilise and contain
23. Map the actual process and handoffs; mark mandatory gates and ownership.
24. Quarantine unidentified WIP; introduce one-job trays and a traveller.
25. Create a defect catalogue with photographs and common reason codes.
26. Start daily SQDCP review, first-piece approval and abnormality tagging.
27. Verify all critical balances and gauges; identify overdue calibration and unsafe or incapable equipment.
28. Begin daily metal and stone reconciliation; close old unexplained transactions separately.
Phase 2: Days 31-60 - standardise
29. Create PQPs, CTQs, SOPs, visual work instructions and control plans for the pilot family.
30. Certify operators and inspectors; implement master samples and the lighting standard.
31. Introduce tool-life, parameter and maintenance records.
32. Launch NCR/CAPA, supplier rating and the controlled-change system.
33. Configure ERP mandatory scans and the exception dashboard, beginning with the pilot.
Phase 3: Days 61-90 - prove effectiveness
34. Run layered process audits and measurement-agreement studies.
35. Reduce the top three Pareto defects using verified root-cause trials.
36. Validate process windows and conduct pilot capability or repeatability studies.
37. Audit full genealogy and metal balance from order to dispatch.
38. Scale only after four consecutive weeks of reliable compliance and improving FPY.
Phase 4: Months 4-6 - scale
39. Roll the controls to remaining product families and processes in risk order.
40. Develop suppliers and subcontractors; tighten incoming inspection based on performance.
41. Add fixtures, poka-yoke and selective automation supported by a documented business case.
42. Introduce cost-of-poor-quality and capacity/yield planning.
Phase 5: Months 7-12 - optimise
43. Use SPC and capability on stable measurable CTQs; reduce inspection only after capability is proven.
44. Automate data capture, images, recipe interlocks and exception alerts.
45. Benchmark defect-free launch, metal recovery, cycle time and customer returns.
46. Conduct a formal management-system audit and prepare for any desired external certification.
The 90-day responsibility matrix
|
Deliverable |
Accountable |
Responsible |
Consulted |
Due |
|
Policy, governance and resources |
Plant Head |
Implementation Lead |
Quality / Production |
Week 1 |
|
Process map and gates |
Production Manager |
Department Heads |
Quality / Planning |
Week 2 |
|
Defect catalogue and CTQs |
Quality Head |
Quality Engineers |
Design / Production |
Week 3 |
|
Metal / stone reconciliation |
Finance / Plant Head |
Metal Controller |
Stores / Production |
Week 2 |
|
Pilot PQP / control plans |
Quality Head |
Process Owners |
CAD / Planning |
Day 30 |
|
Training / certification |
Production Manager |
Supervisors |
HR / Quality |
Day 60 |
|
ERP traceability pilot |
Plant Head |
MIS Owner |
All functions |
Day 60 |
|
Capability + audit proof |
Quality Head |
Quality / Process Eng. |
Production |
Day 90 |
16. Invest in control before speed
|
Priority |
Typical investment |
Why |
|
1 |
Calibrated balances and gauges, lighting, master samples, trays and labels |
Stops identification and measurement errors |
|
2 |
Fixtures, go/no-go gauges, tool control and extraction/recovery |
Prevents repeat defects and metal loss |
|
3 |
Machine condition/PM, furnace mapping and bath monitoring |
Stabilises process output |
|
4 |
Barcode or RFID travellers and ERP gates |
Creates traceability and real-time exceptions |
|
5 |
Vision/measurement, recipe interlocks and parameter capture |
Reduces dependence on memory and late inspection |
|
6 |
Robotics or automatic finishing/setting where capable |
Adds capacity only after the process is stable |
Every automation proposal must identify the defect mode removed, CTQ controlled, fail-safe response, verification method, maintenance and spares plan, cybersecurity and data ownership, and payback based on quality + metal + labour + capacity - not labour alone.
17. Audit the system at the point of work
Layered Process Audit: ten questions in ten minutes
|
Question |
Yes / no evidence |
|
Is the correct released job and revision at the station? |
Traveller, file and SKU match |
|
Is first-piece approval current after the last change or start? |
Signed result and sample |
|
Are CTQs and limits visible and understood? |
Ask operator and observe the method |
|
Are gauge, tool, calibration and material lots valid? |
IDs, status and date |
|
Is WIP uniquely identified and segregated? |
Physical tray versus ERP |
|
Are defects stopped, tagged and recorded rather than silently repaired? |
Hold area, NCR and rework log |
|
Do actual parameters match the standard? |
Observe and compare with the log |
|
Is count/weight handover complete? |
Latest transfer record |
|
Is the reaction plan being followed? |
Open abnormality evidence |
|
Are previous audit actions sustained? |
Verification at point of use |
Audit frequencies
Supervisors audit critical stations daily. Department heads audit weekly. Plant and Quality leadership conduct monthly cross-functional audits. The system or internal audit is quarterly and risk-based. Product audit occurs before dispatch using the defined sampling plan plus 100% critical checks. Every failed audit requires containment, an action owner and due date, and effectiveness verification.
18. Ready-to-use operating formats
The following fields can be transferred directly into controlled paper or digital forms. They are deliberately compact: the form should capture objective evidence without inviting hidden free-text workarounds.
A. Job traveller - minimum fields
|
Block |
Fields |
|
Identity |
Job ID, customer, SKU, revision, quantity, due date and product photo |
|
Specification |
Metal/karat/colour, target weight/range, stone map, CTQs and special notes |
|
Routing |
Operation, department, operator, machine/tool, start/finish and quantity in/good/reject |
|
Handover |
Count, weight, sender/receiver, time and status |
|
Quality gates |
Measured/visual results, gauge ID, inspector and release/hold |
|
Rework |
Defect/reason code, authorisation, operation, quantity and result |
|
Closure |
Final count and weights, stones, hallmark, packaging, photo and dispatch ID |
B. First-piece approval
|
Field |
Entry |
|
Job / SKU / revision |
____________________________ |
|
Process / machine / operator |
____________________________ |
|
Trigger |
Shift start / setup / change / restart |
|
CTQ and specification |
____________________________ |
|
Result / gauge ID |
____________________________ |
|
Visual-master reference |
____________________________ |
|
Disposition |
Approved / Correct and resubmit / Hold |
|
Supervisor / Quality / time |
____________________________ |
C. Nonconformance report
|
Field |
Entry |
|
NCR / date / source |
____________________________ |
|
Job / SKU / revision / lot |
____________________________ |
|
Defect + class + photo |
____________________________ |
|
Quantity checked / affected / held |
____________________________ |
|
Last known good / containment scope |
____________________________ |
|
Disposition + authoriser |
Use-as-is / Rework / Remake / Scrap |
|
Occurrence / escape / systemic cause |
____________________________ |
|
Actions / owner / due |
____________________________ |
|
Verification / effectiveness / closure |
____________________________ |
D. Daily SQDCP board
|
Pillar |
Yesterday |
Today target |
Gap / action / owner / due |
|
Safety |
|
||
|
Quality: FPY / top defects / holds |
|
||
|
Delivery: plan vs actual / late |
|
||
|
Cost: rework / scrap / metal variance |
|
||
|
People: attendance / skills / training |
|
E. Final QC checklist
|
Check |
Result |
Inspector |
|
Correct SKU / revision / order |
Pass / Fail |
________ |
|
Count and weight |
Pass / Fail |
________ |
|
Dimensions / size |
Pass / Fail |
________ |
|
Stone count / identity / security |
Pass / Fail |
________ |
|
Surface and symmetry |
Pass / Fail |
________ |
|
Function and safety |
Pass / Fail |
________ |
|
Purity / hallmark status |
Pass / Fail |
________ |
|
Cleanliness |
Pass / Fail |
________ |
|
Pair/set matching |
Pass / Fail |
________ |
|
Packaging / labels |
Pass / Fail |
________ |
|
Final photo and seal |
Pass / Fail |
________ |
19. Management launch checklist and practical appendices
Management launch checklist
47. Quality Head reports independently enough to stop product and shipment.
48. Top management signs the no-pass-forward and no-hidden-rework rules.
49. Every SKU family has an owner and controlled PQP; the pilot is selected.
50. Every piece or batch has a traceable ID and controlled route.
51. All critical gates, CTQs, methods, frequencies and reaction plans are defined.
52. Metal and stones reconcile daily by job, owner or entity, karat and department.
53. Operators and inspectors are certified for assigned work.
54. Critical measuring equipment is verified or calibrated and suitable.
55. The daily dashboard reports FPY, defects, rework, WIP ageing, delivery and variance.
56. NCR/CAPA distinguishes occurrence, escape and systemic causes.
57. Maintenance, environment, suppliers and subcontractors are included in the same system.
58. Management funds the top risks and reviews 30/60/90-day evidence.
|
FIRST MONDAY ACTION Walk one live order from the customer requirement to dispatch. At every handoff ask: "What proves this is the correct piece, correct revision, correct quantity and weight, and acceptable quality?" Every answer that depends on memory becomes an action. |
Appendix 1: Defect-code starter dictionary
|
Process |
Suggested codes |
|
CAD / print |
C01 wrong revision; C02 thin wall; C03 weak prong; P01 missing feature; P02 distortion; P03 layer shift |
|
Casting |
K01 incomplete fill; K02 porosity; K03 inclusion; K04 crack; K05 shrinkage; K06 wrong alloy or colour |
|
Assembly |
A01 misalignment; A02 poor joint; A03 excess solder; A04 distortion; A05 missing component |
|
Setting |
S01 loose stone; S02 broken or chipped; S03 uneven or tilted; S04 wrong stone; S05 damaged prong or bead |
|
Finishing |
F01 tool mark; F02 rounded detail; F03 pit or visible porosity; F04 colour mismatch; F05 plating defect |
|
Final / dispatch |
Q01 wrong size; Q02 function fail; Q03 sharp edge; Q04 pair mismatch; D01 wrong label or pack |
Extend the dictionary only through controlled change. A short, reliable list produces better Pareto analysis than hundreds of overlapping codes.
Appendix 2: Set up practical acceptance standards
1. Collect 30-50 representative good, borderline and reject pieces - or high-resolution photographs - for each product family.
2. Use a cross-functional panel to agree the defect name, severity, viewing distance, light, magnification, location categories and accept/reject boundary.
3. Create physical boundary samples where stable; otherwise use controlled images with arrows and scale.
4. Run an inspector-agreement exercise; resolve disagreements and rewrite ambiguous criteria.
5. Issue a unique standard ID and revision at every relevant station, and withdraw obsolete sets.
6. Review the standard after customer complaints, process change or evidence of inconsistent decisions.
Appendix 3: The first ten improvement projects
|
No. |
Project |
Expected result |
|
1 |
One-job trays + barcode traveller |
Eliminate mixing and missing handovers |
|
2 |
Daily metal balance by process |
Expose loss and transaction gaps in the same shift |
|
3 |
First-piece approval at casting, setting and finishing |
Prevent batch-wide defects |
|
4 |
Top-20 visual defect catalogue |
Align operators and inspectors |
|
5 |
Controlled lighting at final QC |
Reduce subjective surface decisions |
|
6 |
Stone-security standard by setting type |
Reduce loose-stone returns |
|
7 |
Validated investment, burnout and casting recipes |
Reduce porosity and incomplete fill |
|
8 |
Tool-life controls and joint fixtures |
Reduce prong and joint variation |
|
9 |
Operator and inspector certification matrix |
Match work risk to proven skill |
|
10 |
NCR/CAPA with 30-day effectiveness check |
Prevent recurrence |
Closing instruction to management
Start with one value stream, prove the control system, then scale. Do not launch hundreds of forms at once. The visible signs of success after 90 days are identified WIP, clean handoffs, reliable metal and stone reconciliation, operators stopping abnormalities, first-piece discipline, fewer repeat defects, honest FPY and management actions closed on time. Once these behaviours are stable, automation and statistical control can multiply the gain.
|
OPERATING PROMISE Make it right. Prove it right. Never pass a known defect. |
PART II | COMPLETE PRACTICAL CASE STUDY
One 18K Yellow-Gold Diamond Ring: Design to Final Quality Control
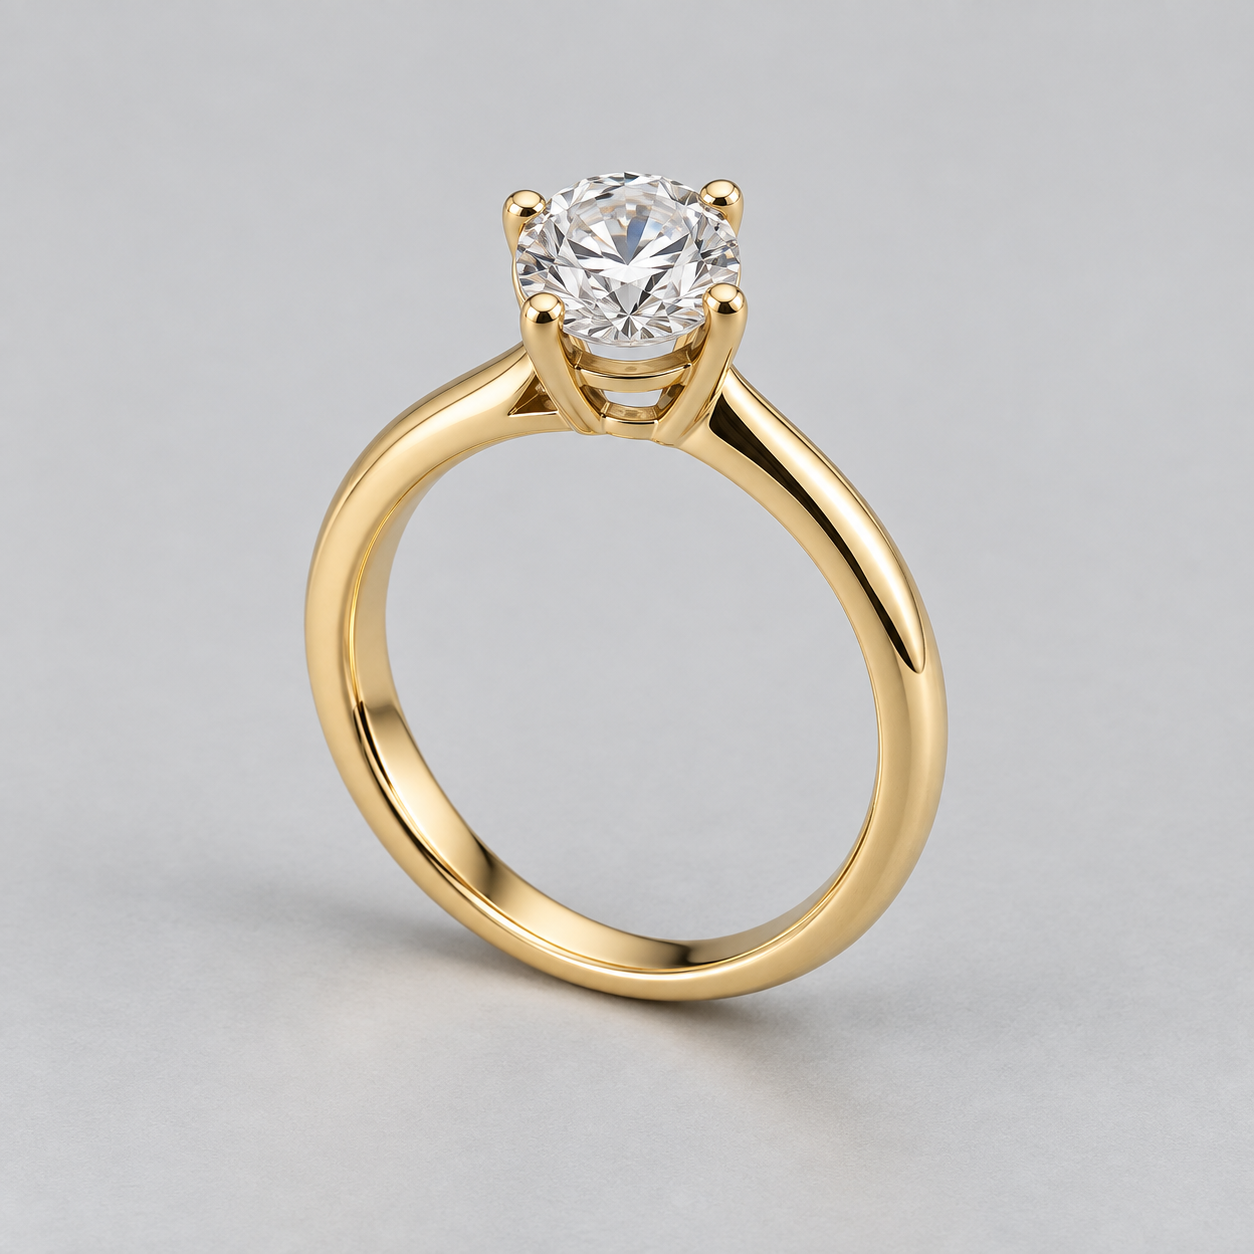
This case study follows one controlled training product through every department: a simple four-prong solitaire ring in 18K yellow gold with one round brilliant diamond. It converts the factory-wide operating system into a concrete route, release gates, stop conditions and handover evidence.
|
TRAINING-PRODUCT CAUTION The dimensions and weights in this case study are controlled training values, not universal jewellery limits. Engineering must validate strength, casting shrinkage, finishing allowance and customer requirements for every real SKU. |
1. Freeze the product master before work starts
|
Item |
Training specification |
Control |
|
Product |
Plain solitaire ring with a four-prong head |
Approved hero image + drawing |
|
Metal |
18K yellow gold / 750 fineness |
Approved alloy code and lot |
|
Diamond |
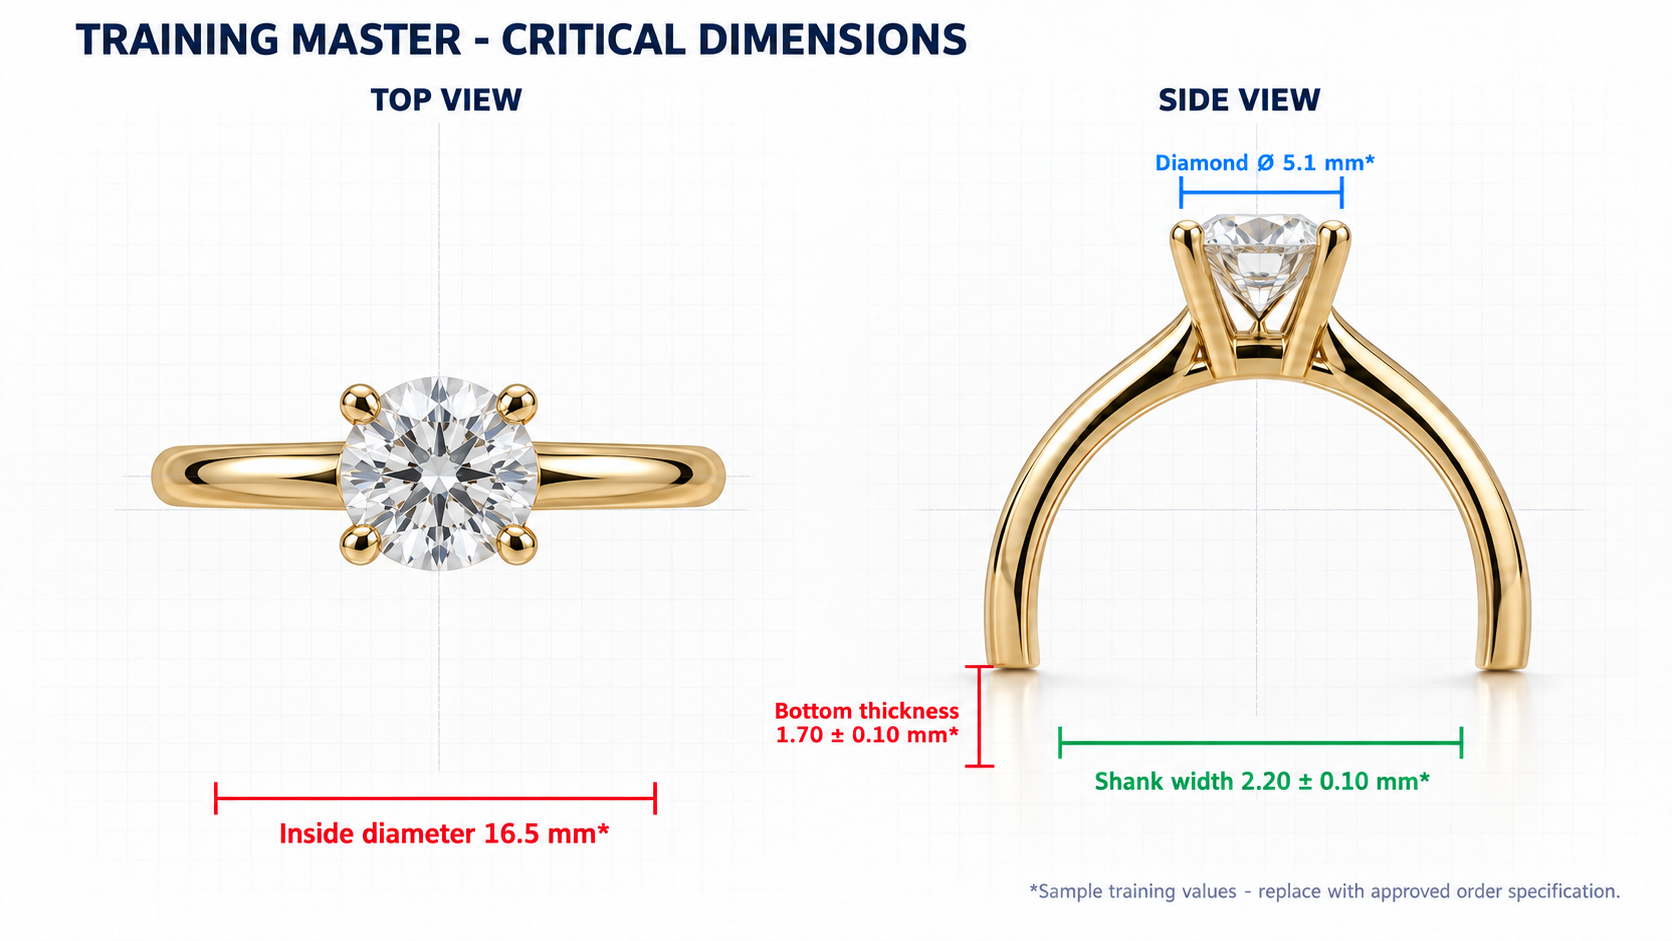
1 round brilliant; approximately 0.50 ct; diameter about 5.1 mm |
Certificate or parcel and measured diameter |
|
Ring size |
Training example: inside diameter 16.5 mm |
Calibrated ring gauge or mandrel |
|
Finished gold weight |
Target 3.20 g; example tolerance +/-0.15 g |
Approved order weight range |
|
Shank |
Width 2.20 +/-0.10 mm; bottom thickness 1.70 +/-0.10 mm |
CAD + final measurement |
|
Prongs |
Four, equal and secure; final geometry per approved master |
10x visual + security test |
|
Finish |
High-polish yellow gold |
Controlled-light master |
2. Complete ring route and job traveller
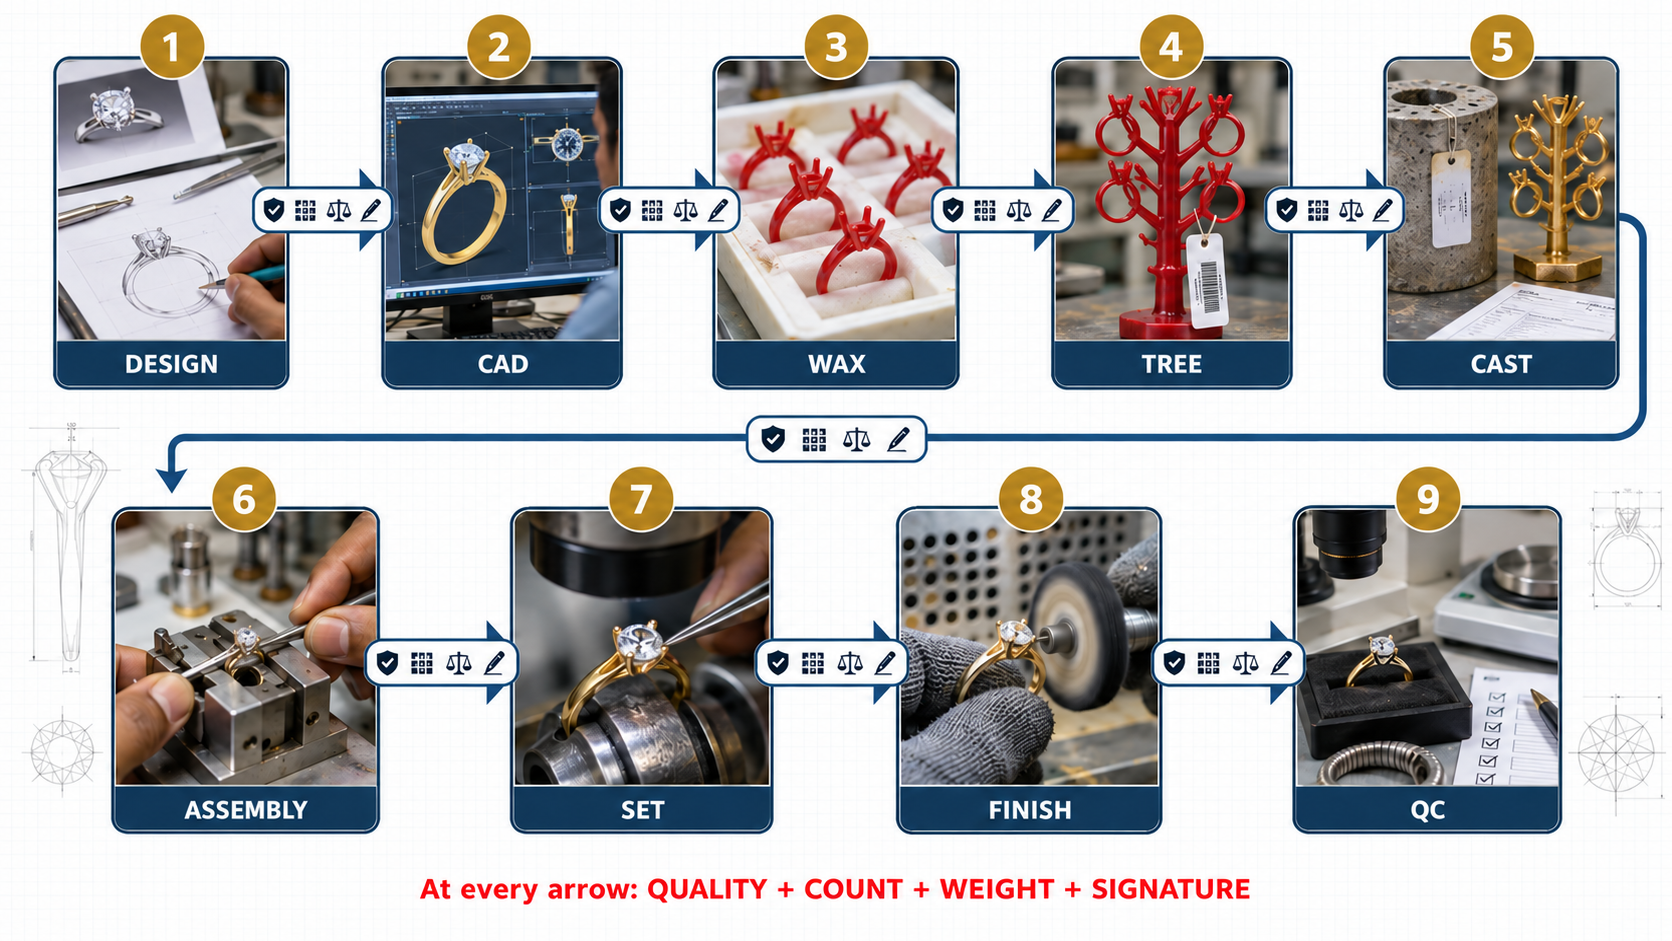
|
Traveller field |
Controlled example |
|
Job ID |
SOL-18Y-001 |
|
SKU / revision |
SOL050-4P / Rev A |
|
Order quantity |
Pilot: 10 rings |
|
Metal issue |
18K yellow gold; alloy lot Y18-___ |
|
Diamond parcel |
DIA050-___; 10 + approved spare stones |
|
Target finished weight |
3.20 g +/-0.15 g each |
|
Critical gates |
CAD, first wax, casting, pre-setting, post-setting and final QC |
|
One-job tray |
Tray no. ___; count and weight at every handover |
|
NON-NEGOTIABLE ROUTE RULE No ring moves to the next department without the correct job and revision, accepted quality, piece count, weight and signatures. |
3. Design brief and CAD engineering
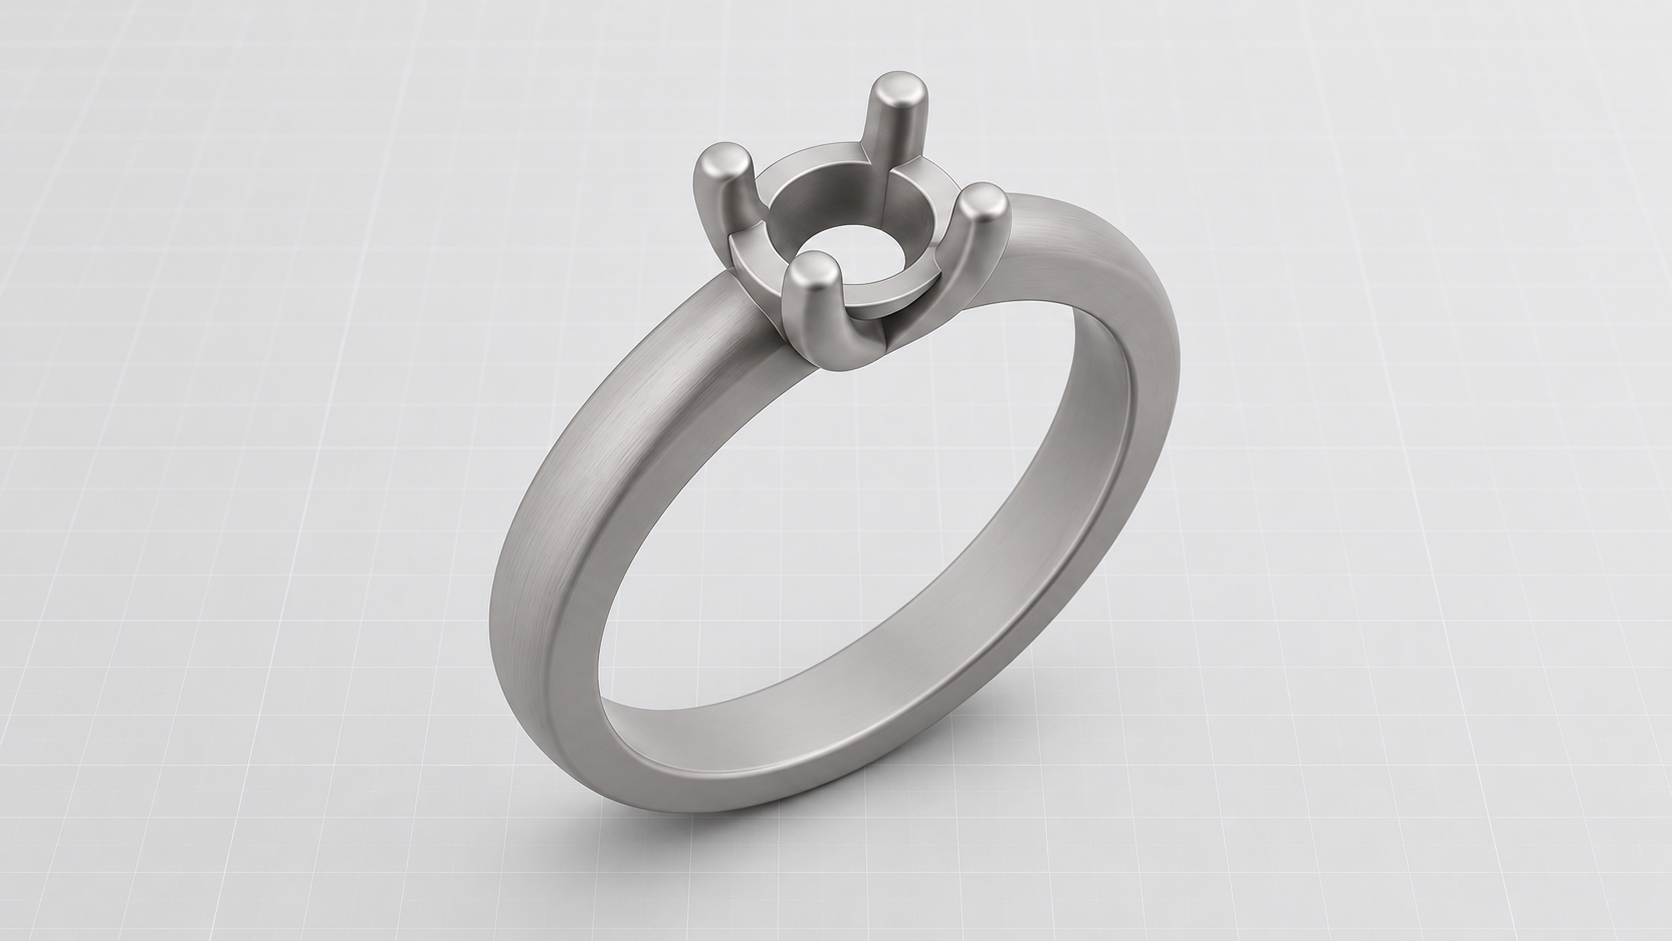
|
OBJECTIVE Convert the approved ring idea into a strong, castable, settable and finishable model. |
Exact work sequence
|
Step |
Action |
Who proves it |
|
1 |
Confirm 18K yellow gold, diamond diameter, ring size, weight, finish and quantity. |
Design coordinator |
|
2 |
Create Rev A CAD with a unique filename. |
CAD operator |
|
3 |
Check inside diameter, shank width and thickness, four prongs, seat and setting access. |
Senior CAD |
|
4 |
Calculate CAD volume and predicted weight using a validated alloy and process factor. |
CAD + Production |
|
5 |
Release only the approved file and its screenshot. |
CAD supervisor |
Release gate
7. The drawing and hero image match.
8. Four-prong symmetry and the stone seat are correct.
9. Every dimension meets the approved master.
10. Predicted finished weight is within target.
|
STOP / REJECT IF Wrong revision; thin shank or prong; poor setting or polishing access; or predicted weight outside target. |
|
HANDOVER RECORD Released CAD file + revision + screenshot + CTQ checklist + predicted weight. |
4. Wax printing and pattern inspection
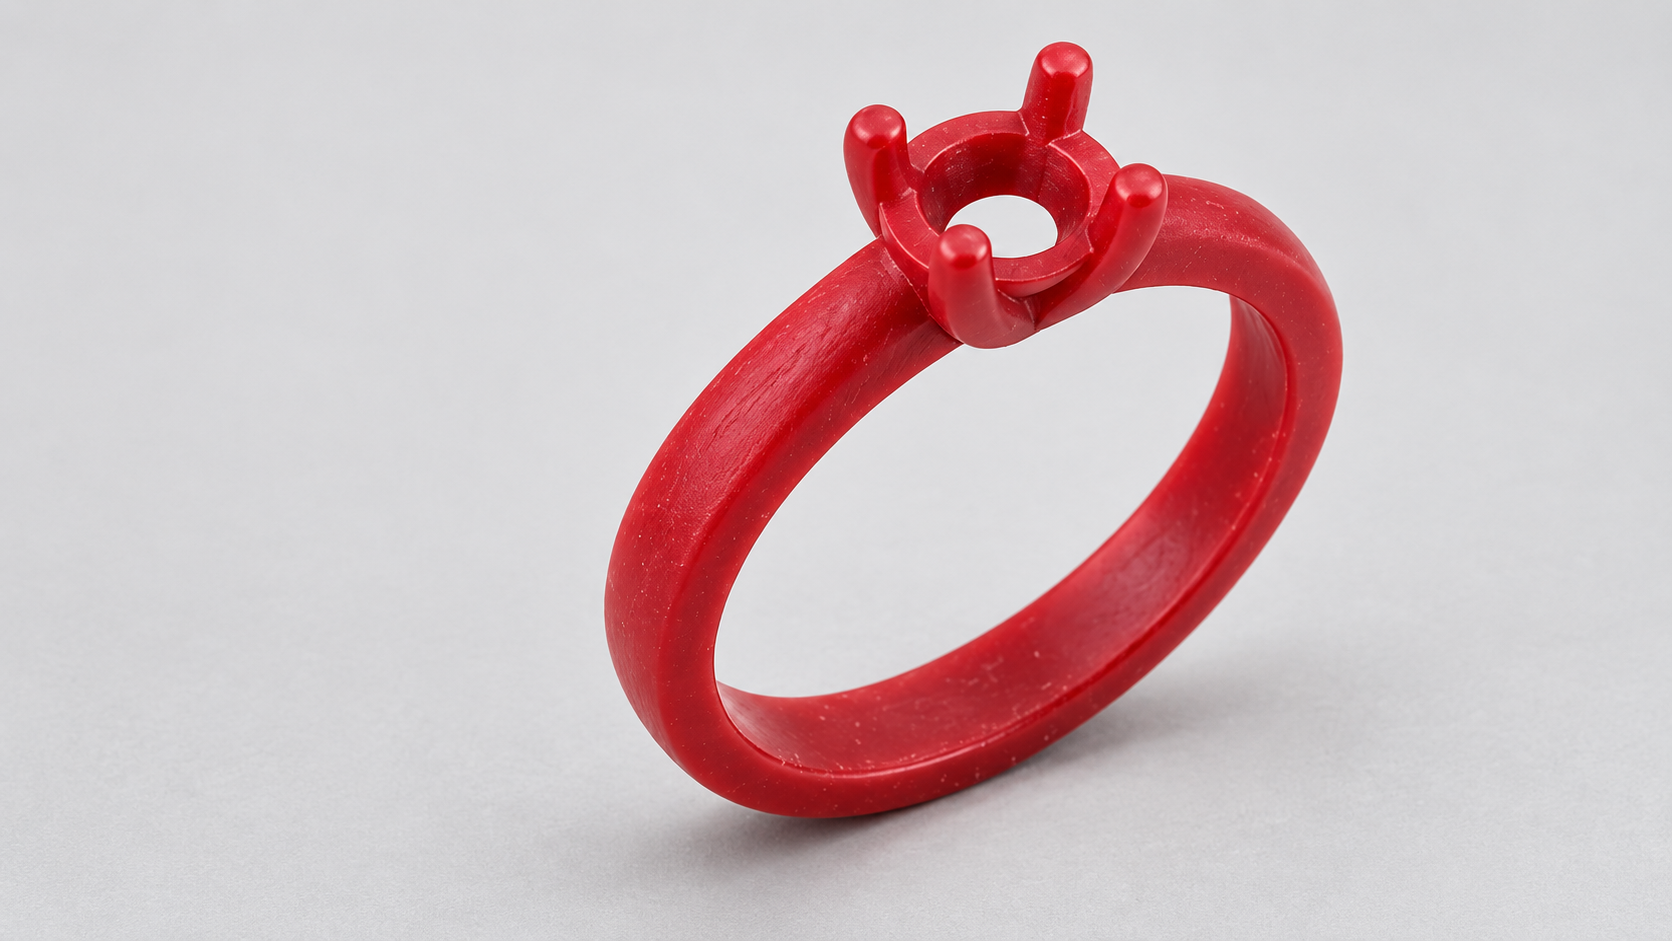
|
OBJECTIVE Produce ten complete and dimensionally stable wax patterns of the approved Rev A ring. |
Exact work sequence
|
Step |
Action |
Who proves it |
|
1 |
Scan and check the job ID and Rev A before nesting. |
Print operator |
|
2 |
Use the approved printer, wax lot, orientation and settings. |
Print operator |
|
3 |
Print one first pattern and measure its critical dimensions. |
Supervisor / QC |
|
4 |
After first-piece approval, print the balance quantity. |
Supervisor |
|
5 |
Inspect 100% for missing prongs, distortion, layer shift and damage. |
Pattern QC |
|
6 |
Count 10 good patterns into the one-job tray. |
Sender + receiver |
Release gate
11. The first wax matches master dimensions after approved process compensation.
12. All four prongs and the seat are complete.
13. Ten good patterns are present, with no hidden wax repair.
|
STOP / REJECT IF Any missing feature, bent or broken prong, distortion, wrong file or material, or unapproved repair. |
|
HANDOVER RECORD Build sheet + printer/material lot + first-piece result + good/reject count + tray card. |
5. Sprue tree, investment and burnout
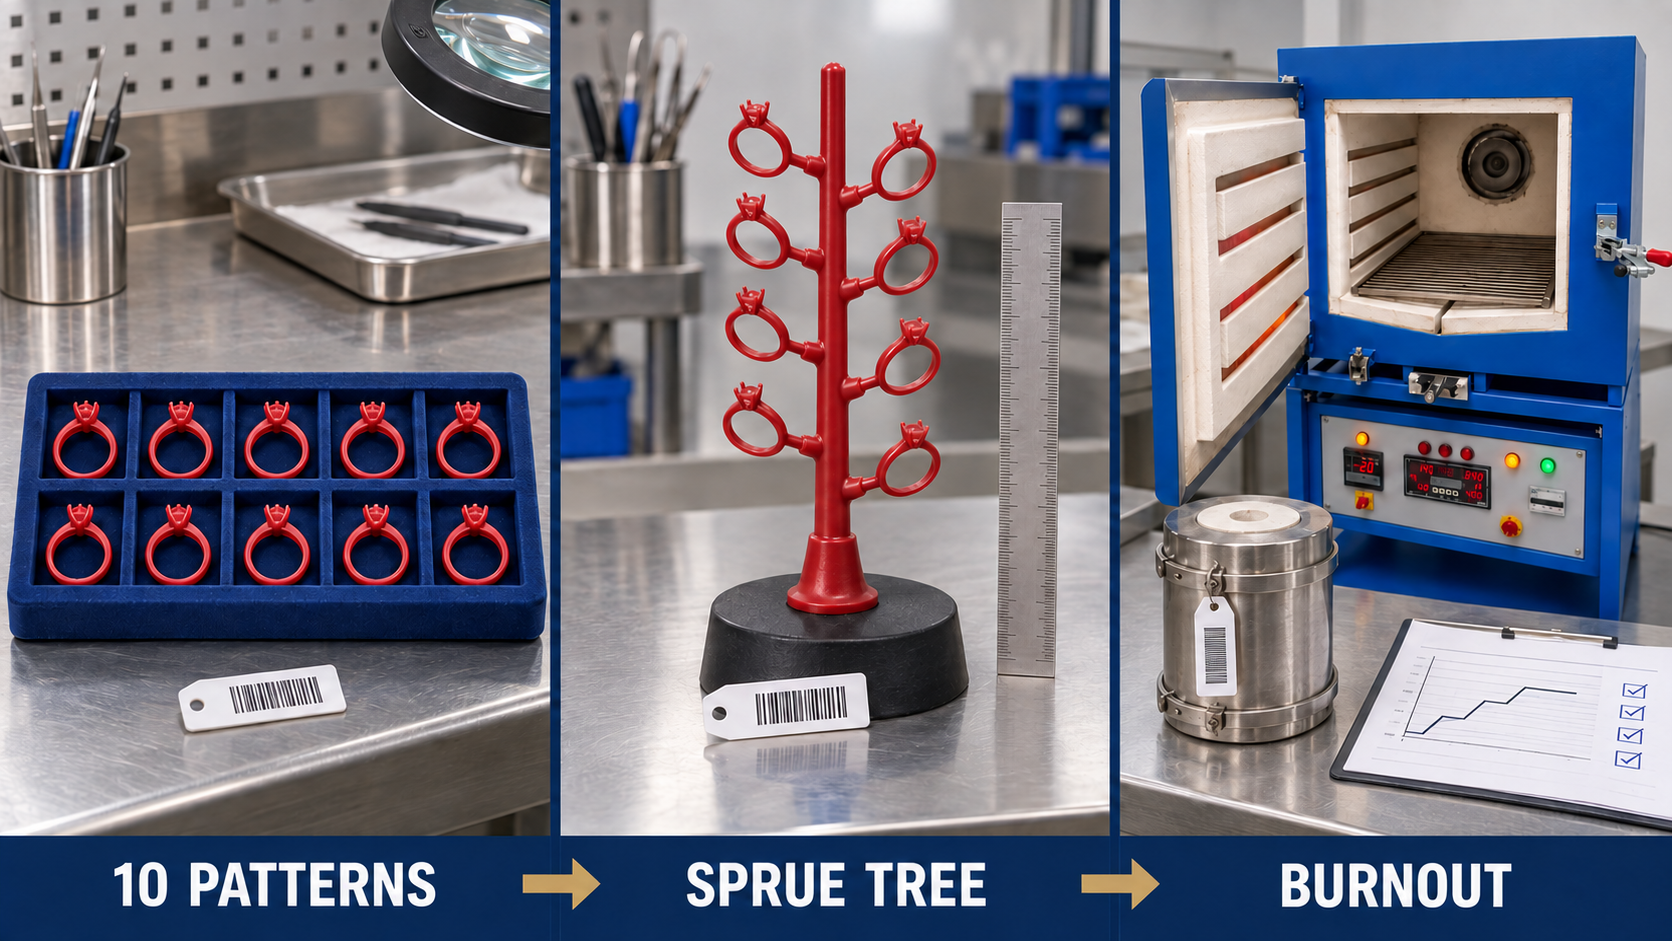
|
OBJECTIVE Create predictable metal flow and a strong mould without damaging or mixing the ring patterns. |
Exact work sequence
|
Step |
Action |
Who proves it |
|
1 |
Count and photograph all 10 patterns. |
Tree operator |
|
2 |
Attach each sprue at the approved shank location and size. |
Tree operator |
|
3 |
Maintain controlled spacing and orientation on the tree. |
Supervisor |
|
4 |
Use the measured powder-to-water ratio and controlled temperatures. |
Investment operator |
|
5 |
Record mixing, vacuum, pouring and bench-set times. |
Investment operator |
|
6 |
Run the validated wax-burnout cycle. |
Furnace operator |
Release gate
14. The tree photograph and pattern count agree.
15. Sprue locations do not damage CTQs or create shrinkage risk.
16. Investment and burnout parameters remain inside the approved window.
|
STOP / REJECT IF Pattern damage, wrong count, mixed job, abnormal investment mix, wrong flask or wrong burnout cycle. |
|
HANDOVER RECORD Tree/flask ID + photograph + pattern count + investment lot and parameters + furnace program. |
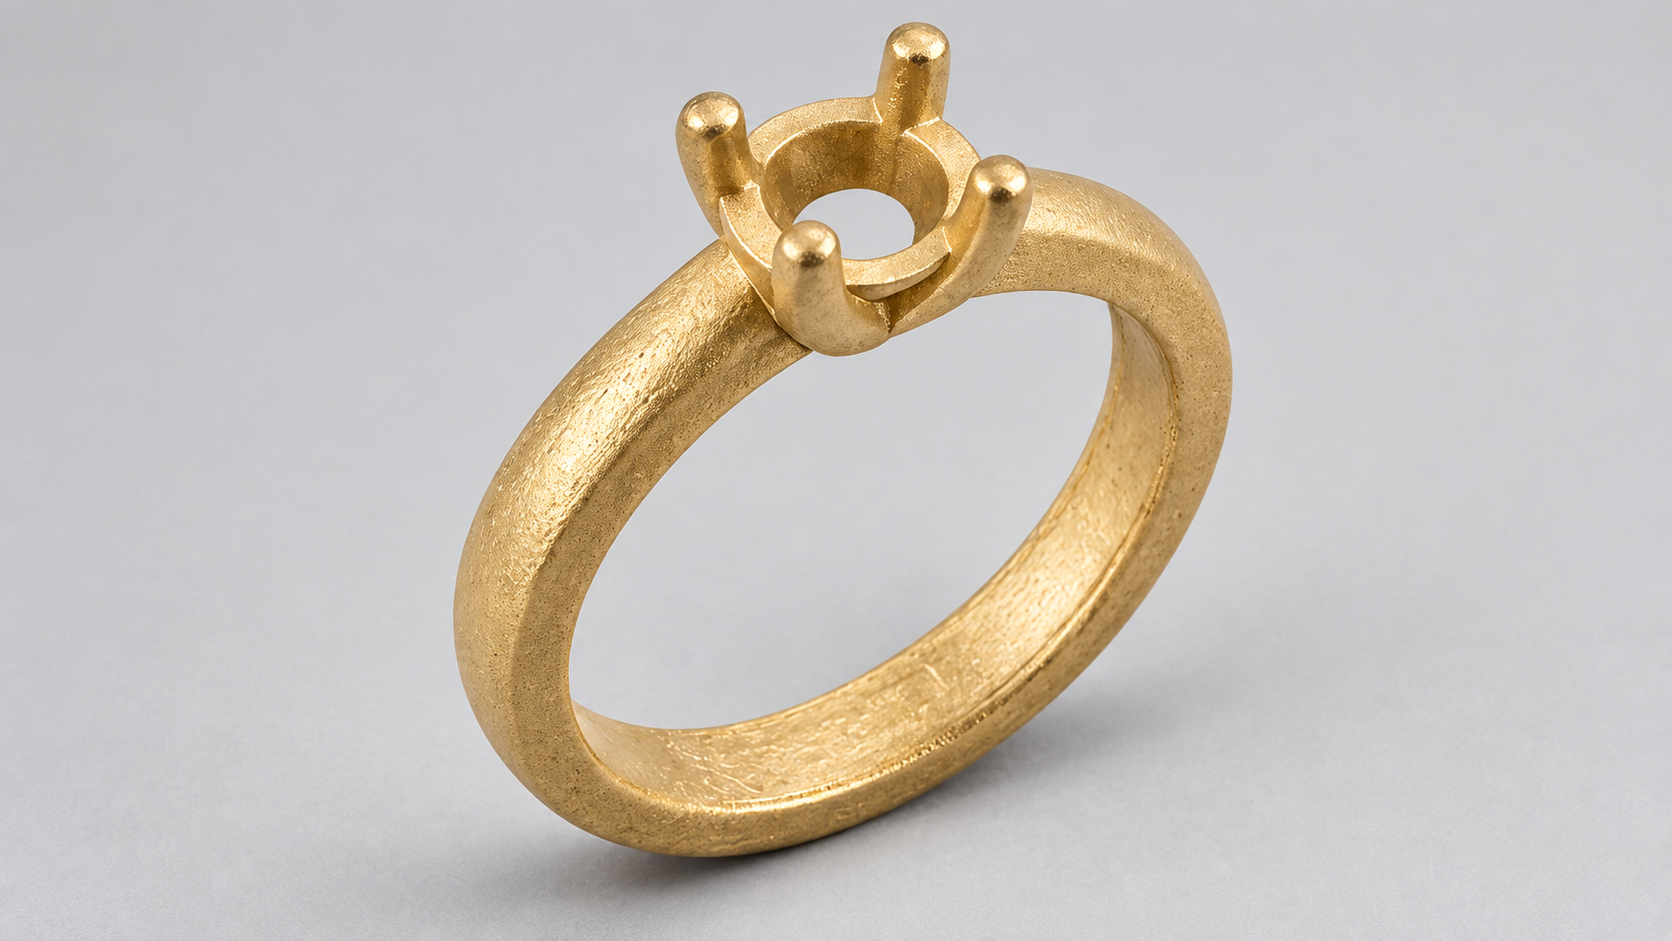
6. 18K yellow-gold casting and metal balance
|
OBJECTIVE Cast sound 18K yellow-gold rings with the correct alloy identity and a complete metal reconciliation. |
Exact work sequence
|
Step |
Action |
Who proves it |
|
1 |
Verify flask ID, burnout status and the casting program. |
Casting supervisor |
|
2 |
Issue identified 18K metal and alloy using a two-person weight. |
Metal controller |
|
3 |
Record metal and flask temperatures, vacuum or pressure, and melt details. |
Casting operator |
|
4 |
Cool and quench inside the validated window. |
Casting operator |
|
5 |
Inspect every ring for fill, porosity, crack, inclusion and distortion. |
Casting QC |
|
6 |
Reconcile metal issue, tree output, recovery and approved loss. |
Metal controller |
Release gate
17. All 10 rings are fully filled and all four prongs are intact.
18. There is no systemic porosity, crack or inclusion.
19. Karat and alloy trace plus the metal balance are complete.
|
STOP / REJECT IF Wrong alloy or colour; incomplete fill; cracks; systemic porosity; parameter excursion; or unexplained metal difference. |
|
HANDOVER RECORD Casting log + alloy lot + input/output weights + defect map + metal reconciliation + release. |
7. Cutting, filing, assembly and pre-polish

|
OBJECTIVE Remove the sprue and prepare each ring for setting without losing shape, dimensions, prong metal or gold. |
Exact work sequence
|
Step |
Action |
Who proves it |
|
1 |
Record tree and ring count and weight before cutting. |
Operator + receiver |
|
2 |
Cut at the approved position and collect every piece of recovery. |
Cutting operator |
|
3 |
File the sprue point while maintaining circularity and shank dimensions. |
Goldsmith |
|
4 |
Correct only authorised minor defects and record the repair. |
Supervisor |
|
5 |
Pre-polish from coarse to fine while protecting prongs, seat and edges. |
Polisher |
|
6 |
Measure size, shank, prongs and pre-setting weight. |
Pre-setting QC |
Release gate
20. Ring size and roundness are correct.
21. Shank width and thickness remain above the approved minimum.
22. All four prongs are equal, sound and sufficient for setting.
23. There are no tool marks, pits, cracks or exposed porosity.
|
STOP / REJECT IF Over-filing, thin shank or prongs, lost symmetry, visible porosity, crack, wrong size or unrecorded repair. |
|
HANDOVER RECORD Count/weight handover + recovery weight + repair log + pre-setting measurement release. |
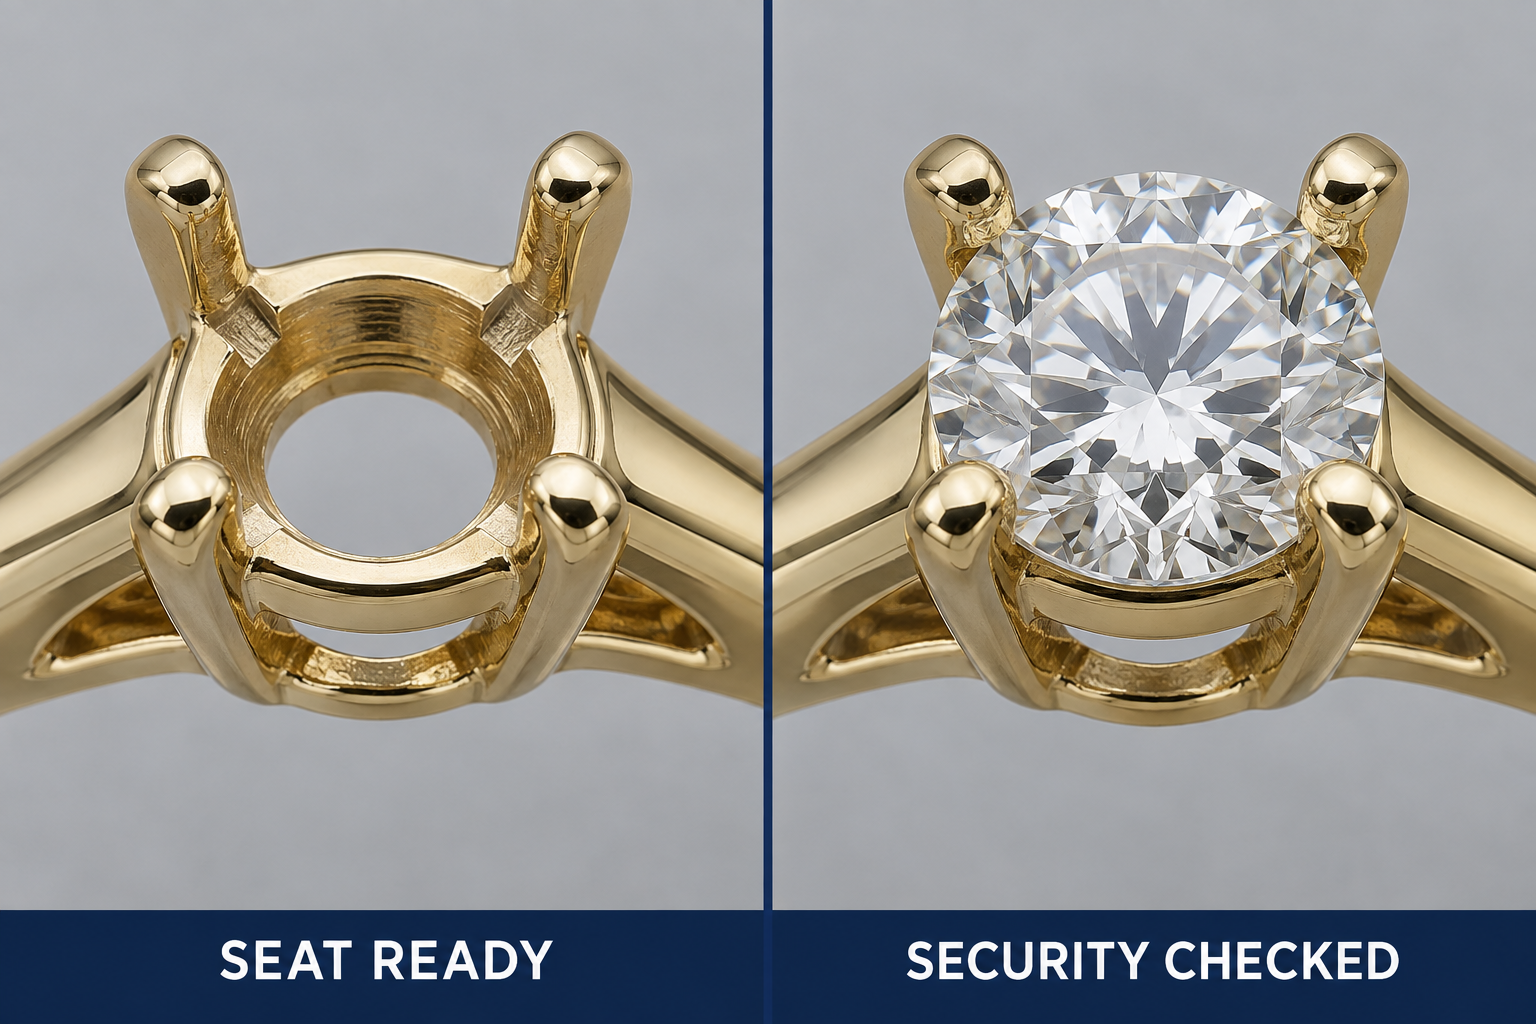
8. Diamond issue and four-prong setting
|
OBJECTIVE Set the correct diamond centrally and securely without stone or metal damage. |
Exact work sequence
|
Step |
Action |
Who proves it |
|
1 |
Verify the diamond certificate or parcel, diameter, count and condition. |
Stone controller |
|
2 |
Issue one diamond per approved ring and record its weight and count. |
Dual custody |
|
3 |
Inspect the seat and four prongs before setting. |
Setter |
|
4 |
Set and approve the first ring before continuing. |
Setting supervisor / QC |
|
5 |
Cut and close prongs evenly while protecting the girdle. |
Authorised setter |
|
6 |
Check 100% for centring, level, damage and movement. |
Post-setting QC |
|
7 |
Reconcile set, broken, unused and missing stones. |
Stone controller |
Release gate
24. The correct diamond and ring are paired.
25. The diamond is level and centred; all four prongs are equal.
26. There is no chip, scratch or girdle damage.
27. There is no movement under the approved tap or probe method.
|
STOP / REJECT IF Wrong or mismatched diamond, damaged stone, cracked seat or prong, uneven or weak prongs, movement, or stone shortage. |
|
HANDOVER RECORD Diamond parcel/certificate + issue/return ledger + first-piece approval + 100% security check. |
9. Final polish, cleaning and finish
|
OBJECTIVE Achieve the approved high-polish yellow-gold finish without loosening the diamond or changing dimensions. |
Exact work sequence
|
Step |
Action |
Who proves it |
|
1 |
Protect the diamond and prongs and follow the approved final-polish sequence. |
Polisher |
|
2 |
Do not over-polish the shank, prongs or hallmark area. |
Supervisor |
|
3 |
Clean using the approved time, temperature and chemistry. |
Cleaning operator |
|
4 |
Inspect under controlled high-CRI light. |
Finish QC |
|
5 |
Recheck diamond security and ring function or comfort. |
QC |
Release gate
28. Uniform yellow-gold lustre matches the approved master.
29. There are no scratches, compound, stains, pits or rounded details.
30. The diamond is clean and secure.
31. Ring size and finished weight remain within specification.
|
STOP / REJECT IF Colour or lustre mismatch, residue, scratch, over-polish, thin prong, loose stone, wrong size or wrong weight. |
|
HANDOVER RECORD Finish route + cleaning log + visual approval + final count/weight handover. |
10. Final quality control and dispatch release

|
OBJECTIVE Independently prove that each finished ring matches the order and is safe to ship. |
Exact work sequence
|
Step |
Action |
Who proves it |
|
1 |
Match the job, SKU Rev A, ring quantity, 18K status and diamond record. |
Final QC |
|
2 |
Measure ring size, shank width and thickness, and finished weight. |
Final QC |
|
3 |
Inspect diamond identity and count, centring, damage and security at 10x. |
Gem / QC |
|
4 |
Inspect every surface under controlled lighting. |
Final QC |
|
5 |
Check comfort, sharp edges and snag risk. |
Final QC |
|
6 |
Match the hallmark, label, invoice, package and final photograph. |
Dispatch auditor |
|
7 |
Seal the package only after the QC signature. |
QC head |
Release gate
32. All critical checks pass at 100%.
33. Finished weight meets the 3.20 g +/-0.15 g training target.
34. The stone is secure, all four prongs are even and there is no damage.
35. Size, finish, hallmark, label and packaging are correct.
|
STOP / REJECT IF Any specification failure, loose or damaged stone, surface defect, wrong identity or document, or incomplete traveller. |
|
HANDOVER RECORD Final QC sheet + measurements + final photograph + inspector + seal or carton number. |
11. One-ring final QC checklist
|
Check |
Training acceptance |
Result |
|
Job identity |
SOL-18Y-001 / SOL050-4P Rev A |
Pass / Fail |
|
Metal |
18K yellow gold; approved hallmark status |
Pass / Fail |
|
Diamond |
1 round; correct parcel/certificate; approximately 5.1 mm |
Pass / Fail |
|
Ring size |
Inside diameter 16.5 mm training value |
____ mm |
|
Finished gold weight |
3.20 g +/-0.15 g training target |
____ g |
|
Shank width |
2.20 +/-0.10 mm training value |
____ mm |
|
Bottom thickness |
1.70 +/-0.10 mm training value |
____ mm |
|
Four prongs |
Equal contact; rounded; no crack; no snag |
Pass / Fail |
|
Stone security |
No movement under approved method |
Pass / Fail |
|
Surface |
No scratch, pit, porosity, residue or stain |
Pass / Fail |
|
Comfort / safety |
Round, comfortable and no sharp edge |
Pass / Fail |
|
Packing |
Label, invoice, photograph and box match |
Pass / Fail |
|
REWORK RULE A reworked ring receives the complete final inspection again - not only inspection of the repaired area. |
Sign-off
|
Role |
Name / signature |
Date / time |
|
Final QC |
|
|
|
Stone QC |
|
|
|
Metal / weight verification |
|
|
|
Dispatch release |
|
12. Implement this example in 30 days
|
Timing |
Factory action |
Proof |
|
Week 1 |
Select this ring as the pilot SKU; freeze the master specification, CAD Rev A and defect photographs. |
Approved product master |
|
Week 1 |
Create one traveller and one tray card for 10 pilot rings. |
Traceable WIP |
|
Week 2 |
Train every department on its case-study section and first-piece gate. |
Skill sign-off |
|
Week 2 |
Start count and weight signatures plus metal and stone ledgers. |
Daily reconciliation |
|
Week 3 |
Produce three pilot lots; record every defect and rework honestly. |
FPY and Pareto |
|
Week 3 |
Correct the top three causes through fixture, method, parameter or gauge changes. |
CAPA evidence |
|
Week 4 |
Audit one complete lot from design brief to final QC. |
Full genealogy |
|
Week 4 |
Approve expansion only after stable results and no hidden rework. |
Management release |
Daily pilot dashboard
|
Measure |
Record |
|
Rings started / finished |
___ / ___ |
|
First Pass Yield by department |
___ % |
|
Reworked rings and defect codes |
____________________________ |
|
Metal issued / finished / WIP / recovery / loss |
____________________________ |
|
Diamonds issued / set / returned / broken / missing |
____________________________ |
|
Late or held job and owner |
____________________________ |
The behaviour that makes the system real
|
ZERO-DEFECT BEHAVIOUR Check the input. Make one first piece. Approve it. Follow the method. Self-check. Stop defects. Count, weigh and sign every handover. |
The case study is deliberately simple, but the discipline scales. The factory succeeds when the correct product, correct material, correct method, correct measurement and correct evidence move together - and when any mismatch stops the flow before it reaches the next customer.